STARLINK GEN 3 WIFI ROUTER Enhancing Homes Router Installation Guide


GEN 3 ROUTER SETUP GUIDE (HIGH PERFORMANCE KIT)
5.
Plug the provided Starlink Gen 3 Router cable into port 1 on the router and the available port on the High Performance Power Supply.
6.
7.
On your device, find and connect to the STARLINK network in your WiFi settings.
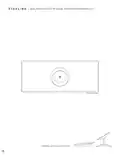
You are now connected! The light on the Gen 3 Router should be solid white, and you can use the Starlink App
to customize additional settings, check your connection, and more.
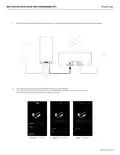
White Line
|
Connected
Yellow Line
|
Poor Signal
Red Line
|
Disconnected
support.starlink.com
| General | Details |
|---|---|
| Name | STARLINK GEN 3 WIFI ROUTER Enhancing Homes Router Installation Guide |
| Make | Starlink |
| Language | English |
| Filetype | PDF (Download) |
| File size | 0.27 MB |

If you have any questions regarding STARLINK GEN 3 WIFI ROUTER Enhancing Homes Router Installation Guide, please ask here and describe the problem in detail.

STARLINK Mini Kit Dish With Built In Router User Guide

UTR-231 Starlink Router User Manual

UTR-232 WiFi 6 Starlink Router Instruction Manual

STARLINK 02633101 Gen 3 Wi-Fi Router User Guide

STARLINK LJ439RBIV3M5 Mini Router Installation Guide

STARLINK Router Installation Guide

STARLINK Mini Kit Dish With Router User Guide

STARLINK Standard Gen 3 Router User Guide


ASUS EBR63 Wireless AX3000 Dual Band Router User Guide

Pix-Link AX02 Wi-Fi 6 Router Installation Guide
robustel R3000 Lite Dual-SIM VPN Router User Manual

TP-Link TD-W9970 300 Mbps Wireless DSL and ADSL Modem Wi-Fi Router Owner’s Manual

FALCON 150 Mbps 4G LTE Portable Router User Manual

Tenda 4G05 Wi-Fi 4G LTE Router Installation Guide

MICRONET AX1800 Dual Band Wi-Fi 6 Router User Guide

LANCOM SYSTEMS IAP-4G Plus LTE 4G Router User Guide

TP-Link TLMR6400 Wireless 4G LTE Router Installation Guide

LANCOM 1793VA VPN Router User Guide