
Doonink FW70 WIFI Router User Manual







Shenzhen Newchiba smartlink technology Co., Ltd.
WIFI industrial router
FW70-WIFI User Manual
Industrial Router FW70-WIFI Product Specification
Version: V1.0
Date: 2019-01-01
The right to interpret the product belongs to Shenzhen 678 Zhilian Technology Co., Ltd
It is subject to change without notice


| General | Details |
|---|---|
| Name | Doonink FW70 WIFI Router User Manual |
| Make | Doonink |
| Language | English |
| Filetype | PDF (Download) |
| File size | 0.53 MB |
 (1 votes, average: 5.00 out of 5)
 Loading...

Doonink FW40-WIFI Wi-Fi Router User Manual

Doonink FW70 WIFI Router User Manual Overview
Summary of Contents
- Page 1: WIFI industrial router FW70-WIFI user manual. Version: V1.0. Date: 2019-01-01. The right to interpret the product belongs to Shenzhen 678 Zhilian Technology Co., Ltd. It is subject to change without notice.
- Page 2: The power supply is normal when the PWR light is solid on. The indicator light flashes quickly after powering up, indicating data transmission. The WIFI light goes off when the power is connected, indicating the wireless function is off or malfunctioning. The system light (SYS) changes from solid to slow flashing about 10 seconds after power is connected, indicating normal system operation. The WAN light extinguishes when the RJ45 port is not connected. The LAN1-LAN3 lamp indicates the signal value of the corresponding range in wireless router mode. The RJ45 port being connected is indicated by the LAN lights being solid on. The system light indicates the status of the system after power connection. The power supply status is indicated by the PWR light. Data transmission is indicated by the quick flashing of the PWR light. The wireless function status is indicated by the WIFI light. The RJ45 port connection status is indicated by the WAN and LAN lights.
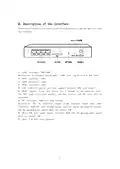
- Page 3: Description of the interface RJ45 interface: WAN/LAN0 can be used as WAN port in standard routing mode. RJ45 interface: LAN1 RJ45 interface: LAN2 RJ45 interface: LAN3 SIM card slot supports standard SIM card. RESET button: Press for 5 seconds to restart and reset successfully. DC interface: DC5V-12V wide voltage design with a maximum power supply of 15W. Micro USB port: power supply interface with a maximum power supply of 15W. 2pcs 2.4G WIFI gain antennas.
- Page 4: Connection This industrial-grade router is set by default to self-test when disconnected. The device will automatically detect network dialing after powering on and will restart if the network is not recognized. Common installation steps for first-time installation users include connecting the device. For a wired connection, set the IP address of the computer to automatically get an IP address and DNS server address. The router will automatically assign an IP address. If specifying a static IP address, set the computer's IP address in the same subnet as the router's LAN port IP address (default: 192.168.10.1 with a subnet mask of 255.255.255.0). For a wireless connection, detect the wireless network of the router. The default WiFi name (SSID) is WIFI-7628-XXXX, and the default WiFi password is 12345678.
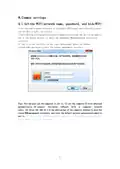
- Page 5: Common settings Set the WiFi network name, password, and hide WiFi. Use your mobile phone to connect to the default WiFi signal emitted by this router, see the device label for details. Open the link with the mobile browser or manually enter 192.168.10.1 on the address bar of the mobile browser to enter the management web background interactive interface. Log in to the interface in the login background. Enter the default account admin password to enter the router management interface. You can also use the computer to set it. Set the computer IP to be obtained automatically, connect the router LAN port with a computer network cable, enter 192.168.10.1 in the address bar of the computer browser to open the router web management interface, and enter the default account and password admin to set it. If you are not familiar with the computer, it is recommended to use your mobile phone to set up the router.
- Page 6: Click 2.4G Wireless - Wireless Settings in the navigation bar in the router management background interface. Enter the name you want to set in the Wireless SSID input box and click the OK button to confirm the settings. In 2.4G Wireless - Wireless Security, enter the password you want to set in the WPA-PSK key input box and click the OK button to confirm the setting. After the setting is completed, the WIFI connection of your mobile phone may be disconnected. Reconnect to the WIFI name you set and enter the password you set to connect.
- Page 7: Click 2.4G Wireless in the navigation bar to access wireless settings in the router management interface. Prohibit broadcasting SSID and click the OK button to hide WiFi. Remember your WiFi name and password before completing the setting, as your mobile phone WiFi connection may be disconnected. Manually add the WiFi name and enter the password to reconnect. For standard wireless routing mode, plug in the available network cable in the WAN port of the device. Select the mode you need in the status bar under WAN settings for connection mode and Internet access mode. For static Internet access, enter the working mode in the router management interface and select the standard routing mode. Set the WAN to Internet mode, select static address, and enter the IP address, network mask, gateway, DNS, and other parameters provided by the ISP.
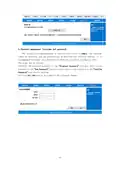
- Page 8: Dynamic Internet access requires entering the working mode of the router management interface and selecting the standard routing mode. For WAN setting in Internet mode, select the dynamic address and click OK to allow the router to automatically obtain parameters assigned by the ISP. PPPoE Internet access involves entering the working mode of the router management interface, selecting the standard routing mode, and choosing PPPoE for WAN setting in Internet mode. You need to enter the username, password, and other relevant parameters provided by the ISP, then click OK.
- Page 9: Wireless AP and wireless client bridge mode (wireless relay) are discussed. Wireless AP and client mode (wireless signal reception) are also mentioned. Non-essential functions are not described in detail. Users who need to know should contact the relevant suppliers.
- Page 10: LAN settings can be modified according to the needs of the local LAN. The assignable address must be in the same network segment as the LAN port IP. The LAN IP address cannot be within the assignable range.
- Page 11: This router supports timed restart, and you can set a specific timed restart time as needed to improve the stability and effectiveness of the device for long-term use.
- Page 12: Software upgrade allows you to load the latest version of the software to your router for enhanced features and stability. To upgrade the software, save the upgrade file to your local computer. Select the software that needs to be upgraded by clicking the <Browse> button. Start the upgrade process by clicking the <Upgrade> button. After the firmware upgrade is completed, it is recommended to press the RESET button to restore factory settings. Restoring to factory settings will erase all settings information of your wireless router. To restore factory settings, click the <Factory Reset> button and confirm the action.
- Page 13: Password management (username and password). The default username/password of the wireless router is admin, the username cannot be modified, and the password can be modified. For security reasons, it is recommended to change this password and keep the password information safe. Enter the original password in the Original Password text box; Enter a new password in the New Password text box and re-enter a new password in the Confirm Password text box to confirm. Click the <OK> button to complete the password change.
- Page 14: Frequently asked questions If you forgot your username and password, you can press and hold the reset button on the device for 5-8 seconds when the router is powered on to restore it to its factory state. To find the WiFi signal of the router, log in to the router management interface and enable the 2.4G wireless function. If the router signal light is on but the Internet speed is slow, try moving the router to a better location, power cycling it, or reducing the distance from the router. The device does not support SIM card hot swapping; please change the card when the router is powered off. Slow wireless Internet access may be due to weak signal, high user load, or interference from nearby electronic devices.
- Page 15: Product warranty card Thank you for choosing our product, this product is guaranteed from the date of sale. If there is a performance problem within 7 days after the purchase of the product, and the appearance is not scratched, the new product can be directly replaced. Within one year of the warranty period, where the installation and use are in accordance with the product instruction manual, you can enjoy free maintenance services for defects in raw materials and processing. Paid maintenance services will be implemented in cases such as failure to present the original valid warranty card. Damage caused by product installation not meeting requirements, standards, and relevant specifications will incur paid maintenance. Damage caused by relevant accessories in the product installation environment that do not meet product requirements will incur paid maintenance. Damage caused by improper use, storage, unauthorized disassembly, or maintenance will incur paid maintenance. Damage caused by natural disasters or external disasters will incur paid maintenance. Failure or damage caused by improper relocation, transportation, and storage will incur paid maintenance. The warranty period is exceeded.
- Page 16: The repair shall be carried out by the authorized maintenance unit, and the maintenance record shall be filled in and stamped, otherwise the maintenance record will be invalid and the warranty qualification will be lost. This device complies with part 15 of the FCC Rules. Operation is subject to the following two conditions: (1) this device may not cause harmful interference, and (2) this device must accept any interference received, including interference that may cause undesired operation. Any changes or modifications not expressly approved by the party responsible for compliance could void the user's authority to operate the equipment. This equipment has been tested and found to comply with the limits for a Class B digital device, pursuant to Part 15 of the FCC Rules. These limits are designed to provide reasonable protection against harmful interference in a residential installation. This equipment generates, uses and can radiate radio frequency energy and, if not installed and used in accordance with the instructions, may cause harmful interference to radio communications. If this equipment does cause harmful interference to radio or television reception, which can be determined by turning the equipment off and on, the user is encouraged to try to correct the interference by one or more of the following measures: Reorient or relocate the receiving antenna. Increase the separation between the equipment and receiver. Connect the equipment into an outlet on a circuit different from that to which the receiver is connected. To maintain compliance with FCC’s RF Exposure guidelines, this equipment should be installed and operated with minimum 20cm distance between the radiator and your body.

CNCU DZB200 Easy Route CNC Router Instructions

SAX1V1R Spectrum WiFi 6 Router User Guide: Troubleshoot & Personalize

DrayTek Vigor2765 Wired VDSL and Ethernet SoHo Router User Guide

TP-Link E4 deco Router Installation Guide

ZTE E1320 WiFi 6 Wireless Router User Manual

ZYXEL SCR 50AXE Secure Cloud-Managed Router with AXE5400 Tri-Band Wifi 6E User Guide

UBIQUITI NETWORKS ER-12 10 Port Gigabit Router User Guide

DrayTek Vigor3910 Series Multi-WAN Security Router User Guide

Dragonglass DGR7 1200M Wireless Router Installation Guide

DrayTek Vigor 1000B Multi WAN Load Balancing Router User Guide