IQ WiFi 6 Router Installation Guide

S8TEP
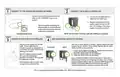
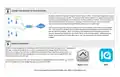
CONNECTING DEVICES TO YOUR NETWORK
By default, IQ WiFi 6 broadcasts 3 disDnct network names or SSID’s. (1) The Main network, (2) a Guest
network and (3) a Security network. The purpose of the Security network is to isolate security devices
like Panels, Secondary Keypads and Cameras from the Main and Guest network. This helps reduce the
chance that these devices will disconnect, causing a truck roll in the future, due to a homeowner
pausing the internet, changing the network name, password or encrypDon type.
Start by connecDng all Wi-Fi devices installed in the home or business to the Main or Guest network
first. Once connected, IQ Panels and Secondary Keypads will automaDcally move themselves to the
Security network by default. Alarm.com Cameras and Doorbells can be manually moved to the
Security network from Mobile Tech, the Partner Portal or the End User website. AddiDonally, both
Mobile Tech and the Partner Portal allow you to “see” the password for the Security network if
needed.
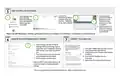
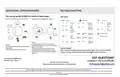
S9TEP
MOBILE MANAGMENT
IQ WiFi 6 can be managed by the homeowner either directly from the Alarm.com app or from a dedicated IQ
WiFi app. In cases where Alarm.com is used, it is recommended to manage devices directly from
Alarm.com. As long as the Controller is added to the ADC account (Step 7 above) no further acDon is
required and IQ WiFi 6 will automaDcally show up for homeowner to control and manage the Main and
Guest networks from their ADC app.
In cases where Alarm.com is not used, the homeowner can download the dedicated IQ WiFi app. To do this,
go to iTunes/App Store or the Google Play store and search for IQ WIFI.
Alarm.com
WiFi
| General | Details |
|---|---|
| Name | IQ WiFi 6 Router Installation Guide |
| Make | IQ |
| Language | English |
| Filetype | PDF (Download) |
| File size | 0.21 MB |

If you have any questions regarding IQ WiFi 6 Router Installation Guide, please ask here and describe the problem in detail.


D-Link AX3200 Mesh Wi-Fi 6 Router DIR-X3260 Installation Guide

STARLINK Mini Kit Dish With Built In Router User Guide

SENWA 4G LTE CPE Router User Guide

EnGenius ESG620 Cloud Managed VPN Router User Guide

Adtran 834-5 SDG PlumeOS Dual-Band Wi-Fi 5 Plume Enabled Ethernet Router User Manual

TP-Link AX3000 Dual Band Gigabit WiFi 6 Router Installation Guide

Taiko Audio V16.x22069 Extreme Router User Manual

Tenda AC9 AC1200 Dual Band Gigabit WiFi Router Installation Guide

JUNIPER NETWORKS PTX10004 Packet Transport Router User Guide

NETGEAR AC2600 Wi-Fi Router User Guide