
Home > TAIKO AUDIO > TAIKO AUDIO ES9039MSPRO Extreme Switch Router Instruction Manual
TAIKO AUDIO ES9039MSPRO Extreme Switch Router Instruction Manual










First Use
The Extreme Router creates a dedicated ‘Taiko Audio’ Wi-Fi network. The
password for this can be found on the boꢂom of the Router. Funcꢀonally, this
works the same as with any other router. We also have the passwords on file
and they are available by request.
To connect with your Control Point (usually your iPad) to the Extreme Music
Server via the Extreme Router, join the Extreme Router’s dedicated ‘Taiko
Audio’ Wi-Fi network. Now, your control point is connected to the Extreme
Music Server.
At this point, please note that the server’s IP Address will change because it is
now being controlled by DHCP running on the Extreme Router rather than on
your default home Router.
Connect to Roon
If you use Roon, then there is no need to find or fetch the new IP Address. The
connecꢀon should simply re-establish automaꢀcally and Roon should work
automaꢀcally from the Roon Remote Control Point (usually your iPad)
connected to the Taiko Wi-Fi network. If it does not, try restarꢀng the Roon app
on your Control Point. In any case, make you sure you are connected to the
Taiko Wi-Fi network.
The router is pre-configured to allow Roon discovery from the “WAN” side,
which is your current home network. As a result, Roon Remote Control Points
should also work from the upstream network without needing to know the IP
address.
In other words, Roon Remote should also work when you are connected to
your home Wi-Fi network instead of the “taiko audio” Wi-Fi. However, please
note that the best Sound Quality is achieved when connecꢀng via the
dedicated Taiko Audio Wi-Fi network.
P a g e 14 | 35
Connect to XDMS
For XDMS, you need to connect the Control Point to the Taiko Wi-Fi network.
With the factory-standard Router setup, XDMS cannot be controlled from your
home network.
When using XDMS for the first ꢀme aſter adding the Router, there is an
addiꢀonal step which is to re-connect the XDMS app to the Server using the
new IP Address.
SFP/SFP+ network ports don't auto negoꢀate / automaꢀcally refresh like RJ45
ports do. Because of this, you may need to trigger the Switch or Server to
trigger an IP Address refresh. In other words, you may need to make the Switch
or Server aware of the updated IP Address.
Normally, it will suffice to remove the power from the Switch, wait 10 seconds,
and reconnect it. Instead, you may opt to disconnect one of the Switch’s DAC
cables, wait 10 seconds, and reconnect it. This will have the same result.
Make you sure you are connected to the Taiko Wi-Fi network.
Now, start XDMS, go to ‘Seꢁngs’ - ’Connect’. Enter your Extreme Server’s Serial
Number (this can be found on the rear of your server) in the upper field and
then tap ‘Fetch’. Alternaꢀvely, you can use third party app ‘Fing’ to scan your
network and obtain the new IP Address, enter it in the lower field, and tap
‘Connect’. The XDMS app will connect and then you are all set.
Please note that Fing only runs on M1 chip or later.
P a g e 15 | 35
Ideal Start Up Rouꢀne
To prevent or solve connecꢀvity issues, the easiest soluꢀon is to follow the
below start up rouꢀne.
1. Disconnect and reconnect the Network Cable to the Extreme Music
Server to force the new IP address. Unplug the network cable from the
Extreme Switch to the Extreme Music Server (usually a DAC cable) for a
few seconds and plug it back in. Alternatively, you can also power off the
Taiko Switch for a few seconds and power it back on. This will achieve
the same as unplugging the network cable. This will force the Extreme
Music Server to refresh its IP address with a new one that is provided by
the Taiko router.
2. Run FING on the tablet to find the Server’s new IP address and use this
in XDMS. FING should find 3 IP addresses: The Extreme Server, Router,
and tablet/client.
3. Reboot the Extreme to trigger XDMS to register the new IP Address.
Then you can use your Extreme’s Serial Number with the option “Fetch”
in the ‘Settings’ --> ‘Connect’ screen of the XDMS App.
P a g e 16 | 35
Step by Step Connecꢀon Methods
Below are detailed step-by-step instrucꢀons describing the two Connecꢀon
Methods.
Connecꢀon Method 1 - Using Roon for automaꢀc Discovery:
1. The first step is to switch to Roon if you are using XDMS, before inserting
the Router. Roon Discovery works through the router using your home
Wi-Fi so you will not need to use an IP lookup app and change your
Control Point’s Wi-Fi (usually your iPad) at the same time.
2. Then proceed with connecting the Taiko Extreme Router (and DC
Distributor if you ordered one) per the instructions in this guide and the
other documentation that can be found on the Downloads page on the
downloads.
3. After everything is connected and powered up, unplug the network
cable from the Taiko Extreme Switch to the Taiko Extreme Music Server
(usually a DAC cable) for a few seconds and plug it back in. Alternatively,
you can also power off the Taiko switch for a few seconds and power it
back on. This will achieve the same as unplugging the network cable.
This will force the Extreme Music Server to refresh its IP address with a
new one that is provided by the Taiko router.
Now, Roon should be able to reconnect from your regular Wi-Fi, and you can
see the new IP address in the Roon Control App. To see the IP Address in Roon,
go to Seꢁngs --> General and look at the ’Roon Core’ secꢀon. You can then
enter this IP Address in XDMS.
Connecꢀon Method 2 – For users of XDMS who do not wish to use Roon:
1. Connect the Control Point (usually your iPad tablet) (which runs the
XDMS client) to the new Taiko Extreme Router Wi-Fi.
2. Disconnect and reconnect the Network Cable to the Extreme Music
Server to force the new IP address. Unplug the network cable from the
Taiko Extreme Switch to the Taiko Extreme Music Server (usually a DAC
cable) for a few seconds and plug it back in. Alternatively, you can also
power off the Taiko Switch for a few seconds and power it back on. This
P a g e 17 | 35
will achieve the same as unplugging the network cable. This will force
the Extreme Music Server to refresh its IP address with a new one that is
provided by the Taiko router.
3. Run FING on the tablet to find the Server’s new IP address and use this
in XDMS. FING should find 3 IP addresses: The Extreme Server, Router,
and tablet/client.
4. Reboot the Extreme to trigger XDMS to register the new IP Address.
Then you can use your Extreme’s Serial Number with the option “Fetch”
in the ‘Settings’ --> ‘Connect’ screen of the XDMS App. If Fetch does not
retrieve the correct IP address you can enter it manually in the field
below.
P a g e 18 | 35
Solving Connecꢀvity Issues
If you run into connecꢀvity issues then the most likely cause is that SFP/SFP+
network ports don't auto negoꢀate / automaꢀcally refresh like RJ45 ports do.
SFP/SFP+ ports also do not automaꢀcally re-establish a network connecꢀon
aſter it went down.
What this means is that when you connect the Extreme Network Switch to the
Extreme Network Router, the Extreme Network Card inside the Extreme Music
Server cannot see that something has changed and it will not refresh its IP
address. In other words, the Router needs to be up and running before the
Switch. This can be fixed using either of the following 3 methods.
Opꢀon 1: Power cycling the Switch
Opꢀon 2: Re-plugging the DAC cable between Server and Switch
Opꢀon 3: Restarꢀng the Music Server.
This is also automaꢀcally accomplished if you follow the following ‘startup’
procedure:
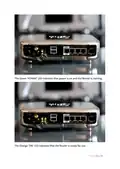
1) Power on the Router, wait unꢀl the ‘ON’ LED is on and/or the network ports
are blinking (which indicates that it is on).
2) Power on the Switch.
P a g e 19 | 35
Factory Reset
1. Hold down the ‘Factory Reset’ button and keep it down.
Simultaneously press the ‘Reset’ button for 2 seconds. Keep the
‘Factory Reset’ button down.
2. The orange ‘ON’ LED will come on, but keep pressing the Factory
Reset button.
3. Next, the orange ‘ON’ LED will start flashing. When it finished
flashing, let go of the ‘Factory Reset’.
P a g e 20 | 35

Accessing the Router Web Interface
For normal recommended use, it is not required to change any internal seꢁngs
for the Extreme Router. But if you want to explore its seꢁngs or want to make
changes, you can do this via its Web Interface. The interface can be found at
the Router’s default IP Address 192.168.100.1.
➔ Please note that the interface is not accessible from your regular home
network.
There are three ways to connect. In most cases, the first opꢀon is easiest.
1. Connect your tablet, phone, or laptop directly to the Extreme Router’s
Taiko Wi-Fi network.
2. Alternatively, you can connect a desktop or laptop to the Extreme
Router via wired Ethernet, whilst making sure to be disconnected from
the home network. The desktop or laptop will now receive a new DHCP
address from the Taiko router.
3. Log onto the Extreme Music Server via VNC, start an internet browser,
and go from there.
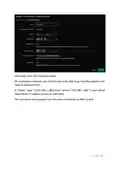
In an internet browser, type hꢂp://192.168.100.1 to log in to the Extreme
Router's admin web UI and reconfigure it as required, per the
recommendaꢀons below.
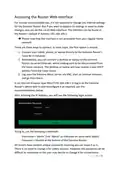
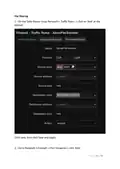
Aſter entering the IP Address, you will see the following login screen:
To log in, use the following credenꢀals:
- Username = ‘admin’ (not ‘Admin’ as indicated on some early labels)
- Password = located at the bottom of the Extreme Router
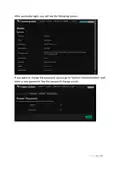
All routers have random unique passwords meaning you can leave it as is.
There is no need to change it for safety reasons. However, the password can be
difficult to memorize so the user may decide to change it for convenience.
P a g e 21 | 35

| General | Details |
|---|---|
| Name | TAIKO AUDIO ES9039MSPRO Extreme Switch Router Instruction Manual |
| Make | TAIKO AUDIO |
| Language | English |
| Filetype | PDF (Download) |
| File size | 0.45 MB |
 (1 votes, average: 5.00 out of 5)
 Loading...
If you have any questions regarding TAIKO AUDIO ES9039MSPRO Extreme Switch Router Instruction Manual, please ask here and describe the problem in detail.

TAIKO AUDIO TAP0016 Extreme Router User Guide

Taiko Audio TAP011 Extreme Router User Manual
TAIKO AUDIO 92592129 Extreme Router User Manual

Taiko Audio V16.x22069 Extreme Router User Manual


D-Link DIR-2660 AC2600 Mesh Wifi Router Installation Guide

AVRTX AVRT9 Portable APRS Track Router User Manual

peplink U8G-P1MT08 MAX Transit Pro E 1Gbps Dual LTE Router Instructions

KEENETIC KN-1310 Wireless Router User Guide

NRadio CC-300 Series 4G LTE Router Instructions

YESKAMO IPC Router Expand NVR Wifi Area and Strengthen Camera Signal User Guide

Cudy WR1500 WiFi 6 Trådløs Router Installation Guide

Cudy LT450 4G LTE AC1200 Dual Band WiFi Router User Manual

ZTE E3330 WiFi 6 Wireless Router User Manual

Urant UNT300M Wireless Router Installation Guide