
TP-Link ER605 Omada VPN Router Installation Guide
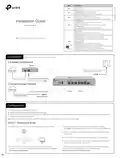


Indication
On: Power is on.
Off: Power is off.
Slow Flashing: System is running normally.
Quick Flashing: The router is being reset.
On/Off: System is starting up or running abnormally.
On: Running at 1000 Mbps, but no activity.
Off: No device is linked to the corresponding port.
Flashing: Running at 1000 Mbps, and transmitting or receiving data.
For USB Modem:
Flashing: A modem is connected, and it is initializing.
On: The modem is loaded.
Off: No modem is inserted, or it is corrupted or incompatible.
For USB Storage:
Installation Guide
Omada VPN Router
On: A USB storage device is inserted and identified.
Off: No USB storage device is inserted, or it is corrupted or incompatible.
For 2.5G Port:
Green On: Running at 2.5 Gbps, but no activity.
Green Off: No device is linked to the corresponding port.
Green Flashing: Running at 2.5 Gbps, and transmitting or receiving data.
Yellow On: Running at 1000/100/10 Mbps, but no activity.
Yellow Off: No device is linked to the corresponding port.
Yellow Flashing: Running at 1000/100/10 Mbps, and transmitting
or receiving data.
Note: The image may differ from the actual product.
For Gigabit Port:
Green On: Running at 1000 Mbps, but no activity.
Green Off: No device is linked to the corresponding port.
Green Flashing: Running at 1000 Mbps, and transmitting or receiving data.
Yellow On: Running at 100/10 Mbps, but no activity.
Yellow Off: No device is linked to the corresponding port.
Yellow Flashing: Running at 100/10 Mbps, and transmitting or receiving data.
Green
Yellow
Connection
Note: For simplicity, we take ER707-M2 as an example.
Connect via Ethernet
Modem
Note: Use the charger provided in the
package to power on the router.
Internet
Connect to RJ45 WAN Port
Connect via fiber network
Internet
2.5G WAN
WAN/LAN
Connect to SFP WAN Slot
Fiber-Optic Cable
Optical Module
Configuration
The router supports two configuration options:
Standalone Mode: Configure and manage the router singly.
Controller Mode: Configure and manage the network devices centrally. It is recommended in the large-scale network, which consists of mass devices such as
access points, switches, and gateways.
Note: When the router is managed by a controller, configurations of the router will be overriden by the controller.
Option 1: Standalone Mode
In Standalone Mode, use a computer to configure and manage the router.
2. Open a web browser and type the default management address
192.168.0.1 in the address field of the browser, then press the Enter key.
3. Create a username and a password for subsequent login attempts and
for security.
4. Use the username and password set above to log in to the webpage.
5. After a successful login, you can configure the function by clicking the
setup menu on the left side of the screen.
Router
PC
1. Connect a computer to a LAN port of the router with an RJ45 cable
properly. If your computer is configured with a fixed IP, change it to Obtain
an IP address automatically.
For detailed configurations, refer to the User Guide of the router. The guide
can be found on the download center of our official website:


| General | Details |
|---|---|
| Name | TP-Link ER605 Omada VPN Router Installation Guide |
| Make | TP-Link |
| Language | English |
| Filetype | PDF (Download) |
| File size | 0.22 MB |
 (1 votes, average: 5.00 out of 5)
 Loading...
If you have any questions regarding TP-Link ER605 Omada VPN Router Installation Guide, please ask here and describe the problem in detail.

TP-Link VR300 Archer Modem Router User Guide

TP-Link T150500-2-DT WiFi Router Instruction Manual

TP-Link Archer AX55 Wi-Fi 6 Router Installation Guide

TP-Link Omada ER8411 VPN Router Instructions

TP-Link Configure VDSL Router User Guide

TP-Link Archer BE805 BE19000 Tri-Band Wi-Fi 7 Router User Manual

TP-Link AX58 Dual Band Gigabit Wi-Fi 6 Router Installation Guide

TP-Link AC750 Wireless Dual Band Router Owner’s Manual

TP-Link AX6000 8-Stream Wi-Fi 6 Router Installation Guide

TP-Link VR600 Wireless DSL Modem Router Installation Guide


alhua DH-AC12 Wireless Router User Guide

digicom 8E4631 Boxed Defective 4G Router User Guide

Cisco RV260P Router User Guide

Wi-Tek WI-R3 1200Mbps Dual-Band Wireless Mesh Router with PoE Passthrough Installation Guide

SEALEY CP20VTR 20V SV20 Series Cordless Trimming Router Instructions

ZTE MF920U 4G MiFi Modem Router User Guide

LUXUL XWR-1750 Dual Band Wireless AC1750 Gigabit Router User Guide

DrayTek Vigor2927 Dual WAN Security Router User Guide

Cudy WR3600E Gigabit Wi-Fi 7 Router Installation Guide

PROSCEND 850G-6PI 6 Port GbE Managed PoE Switch 5G Cellular Router Installation Guide