ALFA HaLow-R WiFi 4 IoT Router User Guide


HaLow-R
User Quick Guide

| General | Details |
|---|---|
| Name | ALFA HaLow-R WiFi 4 IoT Router User Guide |
| Make | ALFA |
| Language | English |
| Filetype | PDF (Download) |
| File size | 0.48 MB |


ALFA HaLow-R WiFi 4 IoT Router User Guide Overview
Summary of Contents
- Page 1: Page 1
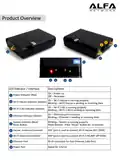
- Page 2: Product overview LED indicator/interface descriptions Power indicator (red) indicates power status. Wi-Fi HaLow indicator (amber) shows operational status. Wi-Fi 2.4G indicator (amber) indicates Wi-Fi 2.4G status. Ethernet indicator (green) shows Ethernet connection status. System indicator (blue) indicates system operation. Reset button allows for resetting the device. HaLow antenna connector is for Wi-Fi HaLow ANT. Wi-Fi antenna connector is for Wi-Fi 2.4G ANT. RJ-45 connector is for fast Ethernet (LAN port).
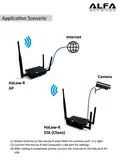
- Page 3: Application scenario involves the Internet and camera. Attach the antenna to the HaLow-R and rotate it until it is tight. Connect the HaLow-R to the computer's LAN port for settings. After settings are completed, connect the Internet to the HaLow-R AP side.
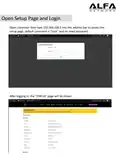
- Page 4: Open a browser and type 192.168.100.1 into the address bar to access the setup page. The default username is root and no password is needed. After logging in, the STATUS page will be shown.
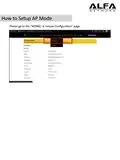
- Page 5: How to setup AP mode Please go to the MORSE → HaLow Configuration page.
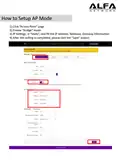
- Page 6: How to setup AP mode Click Access Point page Enable Bridge mode IP settings → Static, and fill the IP address, netmask, gateway information. After the setting is completed, please click the Save button.
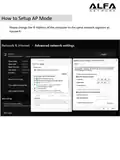
- Page 7: How to setup AP mode Please change the IP address of the computer to the same network segment as HaLow-R.
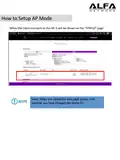
- Page 8: How to setup AP mode When the client connects to the AP, it will be shown on the “STATUS” page. Note: When you reload the web page, please note whether you have changed the device IP.
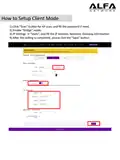
- Page 9: How to setup client mode Please go to the “MORSE → HaLow Configuration” page. Click “Station” page.
- Page 10: How to setup client mode Click “Scan” button for AP scan, and fill the password if needed. Enable “Bridge” mode. IP settings → “Static”, and fill the IP address, netmask, gateway information. After the setting is completed, please click the Save button.
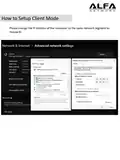
- Page 11: How to setup client mode Please change the IP address of the computer to the same network segment as HaLow-R.
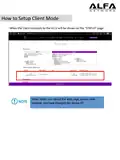
- Page 12: How to setup client mode. When the client connects to the AP, it will be shown on the “STATUS” page. Note: When you reload the web page, please note whether you have changed the device IP.
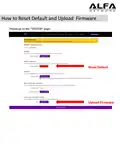
- Page 13: How to reset default and upload firmware. Please go to the “SYSTEM” page. Reset default. Upload firmware.
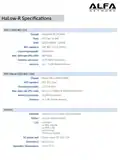
- Page 14: HaLow-R specifications WiFi 4 (IEEE 802.11n) Chipset: MediaTek MT7628AN Flash: SPI Flash 32 MB RAM: DDR2 SDRAM 128 MB WiFi standard: IEEE 802.11n (2.4 GHz) Max. data rate (Phy rate): 300 Mbps WiFi HaLow (IEEE 802.11ah) Chipset: Morse Micro MM6108IQ Max. data rate (Phy rate): Up to 32.5 Mbps @ Bandwidth 8 MHz Dimensions: 93 x 60 mm
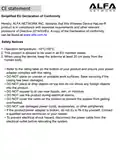
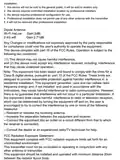
- Page 15: CE statement Simplified EU Declaration of Conformity ALFA NETWORK INC. declares that this Wireless Device HaLow-R product is in compliance with essential requirements and other relevant provisions of Directive 2014/53/EU. Safety Notices Operation temperature: -10°C~55°C. This product is allowed to be used in all EU member states. When using the device, keep the antenna at least 20 cm away from the human body. Refer to the rating label on the bottom of your product and ensure your power adapter complies with this rating. DO NOT place on uneven or unstable work surfaces. DO NOT expose to or use near liquids, rain, or moisture. DO NOT use the product during electrical storms. DO NOT cover the vents on the product to prevent the system from getting overheated. If the product/power adapter is broken, do not try to fix it by yourself.

NRadio Technologies N300 4G Pocket Size LTE Modem Router User Manual

D-Link BE3600 Mesh Gigabit Wireless Router Installation Guide

Cudy X6 AX1800 1800mbps Dual Band Wi-Fi 6 Router Installation Guide

GRANDSTREAM HT812 Powerful 2 Port ATA with Gigabit NAT Router User Guide

HFCL 4XIHMR Home Mesh Router User Guide

TP-Link TL-WR802N 300Mbps Wireless N Nano Router User Manual

ERICSSON R980 Series Ruggedized 5G Router User Guide

TP-Link AX6000 Dual Band WiFi 6 Router User Guide

TP-Link Configure VDSL Router User Guide

NETGEAR NIGHTHAWK BE18000 Tri Band Wi-Fi 7 Router User Guide