Anywhere AX50 Series Dual Band Gigabit Wi-Fi 6 Router User Guide


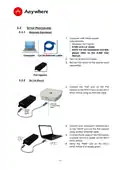


STEP 1
STEP 2
STEP 3
Split the Sealing open. Pass
the Ethernet cable through
the Sealing Nut, Sealing and
Screw Nut.
Tighten the Screw Nut with a
torque value of 0.8 Nm.
Plug the Ethernet cable into
the AX51/ AX52/ AX52e
“ETH 0” port until it locks to
the jack. (Pictures are for
reference only)
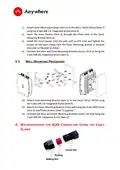
STEP 4
STEP 5
STEP 6
Insert the Sealing into the Tighten the Sealing Nut
Assembly finished. Repeat
Screw Nut.
with a torque value of 0.8
Nm*.
Steps 1-6 on “ETH 1” port.
* Ensure that the seal is tightened enough to ensure water proofing. However, take
care not to use excessive force (over 0.8 Nm) as this may damage the cable gland.
Warning: Weatherproofing the antenna and cable connections is essential and this
can avoid cable connections become loose over time due to vibration and prevents
water from entering the device. Anywhere Networks recommended that you use
butyl rubber and electrical tape to weatherproof all the outdoor connections. For
more information of the weatherproofing procedure, please refer to User Manual.
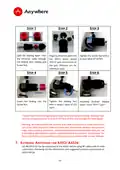
7. EXTERNAL ANTENNAS FOR AX52/ AX52e
GE.AN-5P19-02 can be connected to the AX52/ AX52e using RF cables with N-male
connectors. Following are the information and suggested antenna connections on
AX52/ AX52e.
- 9 -
| General | Details |
|---|---|
| Name | Anywhere AX50 Series Dual Band Gigabit Wi-Fi 6 Router User Guide |
| Make | AnyWhere |
| Language | English |
| Filetype | PDF (Download) |
| File size | 0.38 MB |

If you have any questions regarding Anywhere AX50 Series Dual Band Gigabit Wi-Fi 6 Router User Guide, please ask here and describe the problem in detail.


QiXiang QX520 Dual SIM Router User Guide

acer WA-36W12FU-AKAA 6E Predator Connect W6 Wi-Fi Router User Manual

LUXUL ABR-5000 Epic 5 Gigabit Router User Guide

DrayTek 2620 Series LTE Router User Guide

ASUS ZenWiFi XT9 AX7800 Tri Band WiFi Router User Guide

TP-Link Archer AX12 Dual Band Wi-Fi 6 Router Installation Guide

MOXA EDR-810 Secure Router Installation Guide

perle IRG5541+ FirstNet LTE Router User Guide

Amlogic S905W Android 7.0 TV Box y WiFi Router User Guide

MR2000 Series Linksys Hydra 6 AX3000 Dual Band WiFi 6 Router User Guide