
×
- 1. User Guide (Rt-aax668u → Wireless Ax2700 Dual-band Wi-fi Router)
- 2. Copyright Information (Product Warranty → Disclaimer → Specifications And Information → Trademarks And Copyrights)
- 3. Getting To Know Your Wireless Router (Package Contents → Your Wireless Router → Setup Requirements → Router Setup → Getting Started → Configuring The General Settings)
- 4. G/4g (Using Aicloud 2.0 → Configuring The Advanced Settings → Wireless → Lan → Wan → Firewall)
- 5. Network (Administration → Utilities → Troubleshooting → Frequently Asked Questions (faqs) → Service And Support)
- 6. Getting To Know Your Wireless Router (Welcome! → Package Contents)
- 7. Your Wireless Router (Lan 1~4 Led → Wan (internet) Led → Ghz Led → 4ghz Led → Power Led → Reset Button)
- 8. Usb 2.0 Port (Usb 3.0 Port → Wan (internet) Port → Lan 1 ~ 4 Ports → Notes)
- 9. Positioning Your Router (Keep The Device Away From Metal Obstructions → Keep The Device Away From 802.11g Or 20mhz Only Wi-fi Devices → Always Update To The Latest Firmware)
- 10. Setup (Requirements)
- 11. Router Setup (Important → Wired Connection)
- 12. To Set Up Your Wireless Router Via Wired Connection: (Wireless Connection)
- 13. To Set Up Your Wireless Router Via Wireless Connection: (Setting Up The Wireless Security Settings)
- 14. Getting Started (Logging Into The Web Gui)
- 15. Quick Internet Setup (qis) With Auto-detection (Note → To Use Qis With Auto-detection → Notes)
- 16. The Wireless Router Automatically Detects If Your Isp Connection Type Is Dynamic Ip, Pppoe, Pptp, L2tp, And Static Ip. Key In The Necessary …
- 17. For Static Ip (Notes → Assign The Wireless Network Name (ssid) And Security Key For Your 2.4ghz And 5 Ghz Wireless Connection. Click Apply When Done.)
- 18. Your Internet And Wireless Settings Are Displayed. Click Next To Continue.
- 19. Connecting To Your Wireless Network
- 20. Configuring The General Settings (Using The Network Map)
- 21. Setting Up The Wireless Security Settings (4ghz Security Settings → Ghz Security Settings)
- 22. Wep Encryption (Managing Your Network Clients)
- 23. Monitoring Your Usb Device (The Asus Wireless Router Provides A Usb Port For Connecting A Usb Device Or A Usb Printer To Allow You To Share Files And Printer With Clients In Your Network.)
- 24. Important (Using The Usb Application → Using Aicloud 2.0 → Usb Disk Status → Using Servers Center)
- 25. Safely Removing The Usb Disk (Important! → To Safely Remove The Usb Disk:)
- 26. Creating A Guest Network (Note)
- 27. Configure Additional Options (Enable Guest Network → Assign Wireless Name → Select Authentication Method → Select Encryption Method → Specify Access Time → Access Intranet Settings)
- 28. Aiprotection
- 29. Network Protection (Configuring Network Protection)
- 30. Important! (Router Security Assessment → Manually Configure The Items → Automatically Configure The Security Settings)
- 31. Malicious Sites Blocking (Two-way Ips)
- 32. Infected Device Prevention And Blocking (Weakness Scan → To Enable Infected Device Prevention And Blocking → To Configure Alert Preference)
- 33. Setting Up Parental Controls (Parental Control Allows You To Control The Internet Access Time Or Set The Time Limit For A Clients Network Usage.)
- 34. Web & Apps Filters (Parental Controls → Aiprotection → Enable Web & Apps Filters → Content Category)
- 35. Time Scheduling (To Configure Time Scheduling: → Note: Ensure That Your System Time Is Synchronized With The Ntp Server. → Clients Name → Note: You May Also Key In The Clients Mac Address In The Client Mac Address Column.)
- 36. Using The Traffic Manager (Managing Qos (quality Of Service) Bandwidth)
- 37. On The User-defined Qos Rules Page, There Are Four Default Online Service Types Web Surf, Https And File Transfers.
- 38. User-defined Priority (Upload Bandwidth → Download Bandwidth → Set The Highest Priority Packet)
- 39. Traffic Analyzer
- 40. Using The Usb Application (Using Aidisk)
- 41. Select The Access Rights That You Want To Assign To The Clients Accessing Your Shared Data. (Create Your Domain Name Via The Asus Ddns Services. → Click Finish To Complete The Setting. → To Access The Ftp Site That You Created.)
- 42. Using Servers Center (Using Media Server)
- 43. General (Media Services And Servers → Media Servers → Network Place (samba) Share)
- 44. Follow The Steps Below To Add, Delete, Or Modify An Account. (To Create A New Account: → To Delete An Existing Account: → To Add A Folder:)
- 45. From The List Of Folders, Select The Type Of Access Permission That You Want To Assign For Specific Folders: (Using The Ftp Share Service → Important! → Safely Removing The Usb Disk)
- 46. To Use Ftp Share Service: (Using Aidisk → Ftp Share Tab → Access Rights For Folders → Apply Changes → Accessing The Ftp Server)
- 47. G/4g Usb Modems
- 48. To Set Up 3g/4g Internet Access: (Enable Usb Modem → Location → Isp → Apn (access Point Name) Service (optional) → Dial Number And Pin Code → Username / Password → Usb Adapter)
- 49. Using Aicloud 2.0 (To Use Aicloud 2.0)
- 50. Cloud Disk
- 51. Smart Access (Notes)
- 52. Aicloud Sync
- 53. Configuring The Advanced Settings (Wireless → General)
- 54. Note: You Can Assign Unique Ssids For The 2.4 Ghz And 5ghz Frequency Bands.
- 55. Wpa/wpa2/wpa3 Personal/wpa Auto-personal (Wpa/wpa2/wpa3 Enterprise/wpa Auto-enterprise → Radius With 802.1x → Wep (wired Equivalent Privacy) Encryption Options)
- 56. Wps (To Enable Wps On Your Wireless Network: → Note: Ensure That The Devices Support Wps.)
- 57. Note: Wps Supports Authentication Using Open System, Wpa-personal, Wpa2-personal And Wpa3-personal. Wps Does Not Support A Wireless Network …
- 58. Bridge (To Set Up The Wireless Bridge:)
- 59. Hybrid (Connect To Aps In List → Control Channel → Remote Ap List)
- 60. Wireless Mac Filter (To Set Up The Wireless Mac Filter: → Enable Mac Filter → Mac Filter Mode → Accept → Reject → Mac Filter List)
- 61. Radius Setting (Wpa-enterprise Authentication Mode → Setting Up Wireless Radius Settings)
- 62. Professional Screen Provides Advanced Configuration Options. (Band → Enable Radio → Enable Wireless Scheduler)
- 63. Set Ap Isolated (Multicast Rate (mbps) → Preamble Type → Rts Threshold)
- 64. Dtim Interval (Beacon Interval → Enable Tx Bursting → Enable Wmm Apsd)
- 65. Lan (Lan Ip)
- 66. Dhcp Server (Configure The Dhcp Server)
- 67. Domain Name (Ip Pool Starting Address → Ip Pool Ending Address → Lease Time → Dns And Server Settings → Enable Manual Assignment)
- 68. Route (Note → To Configure The Lan Routing Table)
- 69. Iptv (Configuration Settings → Voip → Multicasting → Udp)
- 70. Wan (Internet Connection)
- 71. Wan Connection Type (Enable Wan → Enable Nat → Enable Upnp → Connect To Dns Server Automatically → Authentication)
- 72. Host Name (Mac Address)
- 73. Port Trigger (To Set Up Port Trigger)
- 74. Trigger Port (Protocol → Incoming Port → Notes)
- 75. Virtual Server/port Forwarding (Setting Up Port Forwarding → Note)
- 76. Configure (Enable Port Forwarding → Famous Server List → Famous Game List → Ftp Server Port → Service Name → Port Range)
- 77. Local Ip (Local Port → Protocol → Port Forwarding Configuration → Differences Between Port Trigger And Port Forwarding)
- 78. Dmz (Setting Up Dmz On A Network → To Set Up Dmz: → To Remove Dmz:)
- 79. Ddns Setup (Enable The Ddns Client → Server And Host Name)
- 80. Enable Wildcard (Nat Passthrough)
- 81. Ipv6 (To Set Up Ipv6)
- 82. Firewall (General → Url Filter)
- 83. To Set Up A Url Filter: (Keyword Filter)
- 84. Keyword Filter (Network Services Filter)
- 85. To Set Up A Network Service Filter: (Advanced Settings → Firewall → Network Service Filter → Enable Network Services Filter → Filter Table Type → Specify The Day And Time → Specify A Network Service To Filter)
- 86. Administration (Operation Mode)
- 87. System (Change Router Login Password → Wps Button Behavior → Time Zone → Ntp Server → Enable Telnet → Authentication Method)
- 88. Firmware Upgrade (Restore/save/upload Setting)
- 89. System Log (To View Your System Log: → General Log → Wireless Log → Dhcp Leases → Ipv6 → Routing Table → Port Forwarding)
- 90. Utilites (Device Discovery)
- 91. Firmware Restoration (Important → Note)
- 92. Set A Static Ip On Your Computer And Use The Following To Set Up Your Tcp/ip Settings: (Firmware Restoration → Setting Up Your Printer Server → Asus Ez Printer Sharing)
- 93. Note: The Print Server Function Is Supported On Windows Xp, Windows Vista, And Windows 7.
- 94. Follow The Onscreen Instructions To Set Up Your Hardware, Then Click Next.
- 95. After The Printers Driver Installation Is Complete, Network Clients Can Now Use The Printer.
- 96. Using Lpr To Share Printer (Sharing Your Lpr Printer)
- 97. Create A New Port (Type Of Port → Tcp/ip Port → Hostname Or Ip Address)
- 98. Select Custom Then Click Settings (Set Protocol To Lpr → Queue Name Field, Key In Lprserver Then Click Ok To Continue)
- 99. Click Next To Finish Setting Up The Standard Tcp/ip Port. (Install The Printer Driver From The Vendor-model List. → If Your Printer Is Not In The List, Click Have Disk To Manually Install The Printer Drivers From A Cd-rom Or File.)
- 100. Click Next To Accept The Default Name For The Printer.
- 101. Download Master (To Use Download Master → Add A Download Task → Select A Download Type)
- 102. Use (Configuring Bit Torrent Download Settings → Speed Limits)
- 103. Nzb Settings
- 104. Troubleshooting (Basic Troubleshooting)
- 105. Restart Your Network (Check Ethernet Cable Connections → Check Wireless Settings → Check Network Settings)
- 106. Some Cable Modem Service Providers Require You To Use The Mac Address Of The Computer Initially Registered On The Account. You Can View The …
- 107. Frequently Asked Questions (faqs) (I Cannot Access The Router Gui Using A Web Browser)
- 108. The Client Cannot Establish A Wireless Connection With The Router.
- 109. Advanced Settings (Wireless → General → Control Channel → Administration → Restore/save/upload Setting)
- 110. Internet Status (Restart Your Network → Parental Control)
- 111. How To Restore The System To Its Default Settings? (Setup A New Ssid And Encryption Key Via A Wired Connection → Reset Your Router To The Default Settings)
- 112. Firmware Restoration
- 113. Cannot Access Web Gui (Before Configuring Your Wireless Router, Do The Steps Described In This Section For Your Host Computer And Network Clients.)
- 114. Mac Os (Windows)
- 115. Ethernet Properties (Internet Protocol Version 4 (tcp/ipv4) → Internet Protocol Version 6 (tcp/ipv6) → Obtain An Ip Address Automatically → Obtain An Ipv6 Address Automatically)
- 116. Mac Os (Windows)
- 117. Appendices (Gnu General Public License → Licensing Information → Gnu General Public License → Preamble)
- 118. When We Speak Of Free Software, We Are Referring To Freedom, Not Price. Our General Public Licenses Are Designed To Make Sure That You Have …
- 119. Terms & Conditions For Copying, Distribution, & Modification (This License Applies To Any Program Or Other Work → Activities Other Than Copying, Distribution And Modification Are Not Covered By This License → You May Copy And Distribute Verbatim Copies Of The Programs Source Code)
- 120. You May Charge A Fee For The Physical Act Of Transferring A Copy, And You May At Your Option Offer Warranty Protection In Exchange For A Fee…
- 121. You May Copy And Distribute The Program (or A Work Based On It, Under Section 2) In Object Code Or Executable Form Under The Terms Of Sectio…
- 122. Distribution Of Source Code (Complete Source Code Definition → Special Exception For Source Code → Access To Copy Source Code → License Acceptance And Rights)
- 123. License Acceptance (Redistribution Rights → Compliance And Enforcement → Conditions Of Distribution → Patent Infringement Considerations → Integrity Of Free Software Distribution)
- 124. Distribution And Use Restrictions (Geographical Distribution Limitations → Revised Versions Of The License → Incorporating Parts Of The Program)
- 125. No Warranty (End Of Terms And Conditions)
- 126. Service And Support
×
ASUS RT-AX68U WiFi 6 Router User Guide










3.2 Creating a Guest Network
The Guest Network provides temporary visitors with Internet
connectivity via access to separate SSIDs or networks without
providing access to your private network.
NOTE: RT-AX68U supports up to six SSIDs (three 2.4GHz and three 5GHz
SSIDs).
To create a guest network:
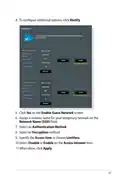
1. From the navigation panel, go to General > Guest Network.
2. On the Guest Network screen, select 2.4Ghz or 5Ghz frequency
band for the guest network that you want to create.
3. Click Enable.
26

| General | Details |
|---|---|
| Name | ASUS RT-AX68U WiFi 6 Router User Guide |
| Make | Asus |
| Language | English |
| Filetype | PDF (Download) |
| File size | 1.3 MB |
 (1 votes, average: 5.00 out of 5)
 Loading...
If you have any questions regarding ASUS RT-AX68U WiFi 6 Router User Guide, please ask here and describe the problem in detail.

ASUS RT-AC86U AC2900 WiFi Gaming Router User Guide

ASUS AC1750 WiFi Dual Band Wireless Internet Router User Guide

ASUS TUF-AX5400 Dual Band WiFi 6 Router User Guide

ASUS ET12 ZenWiFi Pro AXE11000 Tri Band Router User Guide

ASUS RT-AX82U V2 AX5400 Dual Band WiFi Router User Guide

ASUS TUF-AX4200 Dual Band WiFi Router User Guide

ASUS RT-N10U 150 mbps Wireless Router Instructions

ASUS RT-BE96U Tri Band WiFi Router User Guide

ASUS GT-AX6000 Dual Band WiFi 6 Extendable Gaming Router User Guide

ASUS RT-BE88U Dual Band WiFi Router User Guide

wis network WIS-AX3000 WiFi 6 Gigabit PoE Router User Guide

MERCUSYS MR60X AX1500 Wi-Fi 6 Router User Guide

westermo Merlin 4700 Series Cellular Router User Guide

TELTONIKA RUT301 Router User Guide

MikroTik hAP ax³ Wireless Network Router User Manual

TP-Link T120200-2B1 Omada Cat6 Gigabit VPN Router Instructions

PROCEND M331 Cellular Router Installation Guide

Tenda N300 Wi-Fi 4G LTE Router User Guide

motorola Q14 Mesh WiFi 6E Router User Guide

Cudy X6 AX1800 1800mbps Dual Band Wi-Fi 6 Router Installation Guide
Table of Contents
- 1. User Guide - Rt-aax668u →
- 2. Copyright Information - Product Warranty →
- 3. Getting To Know Your Wireless Router - Package Contents →
- 4. G/4g - Using Aicloud 2.0 →
- 5. Network - Administration →
- 6. Getting To Know Your Wireless Router - Welcome! →
- 7. Your Wireless Router - Lan 1~4 Led →
- 8. Usb 2.0 Port - Usb 3.0 Port →
- 9. Positioning Your Router - Keep The Device Away From Metal Ob... →
- 10. Setup - Requirements →
- 11. Router Setup - Important →
- 12. To Set Up Your Wireless Router Via Wired Connection: - Wirel... →
- 13. To Set Up Your Wireless Router Via Wireless Connection: - Se... →
- 14. Getting Started - Logging Into The Web Gui →
- 15. Quick Internet Setup (qis) With Auto-detection - Note →
- 16. The Wireless Router Automatically Detects If Your Isp Connec... →
- 17. For Static Ip - Notes →
- 18. Your Internet And Wireless Settings Are Displayed. Click Nex... →
- 19. Connecting To Your Wireless Network →
- 20. Configuring The General Settings - Using The Network Map →
- 21. Setting Up The Wireless Security Settings - 4ghz Security Se... →
- 22. Wep Encryption - Managing Your Network Clients →
- 23. Monitoring Your Usb Device - The Asus Wireless Router Provid... →
- 24. Important - Using The Usb Application →
- 25. Safely Removing The Usb Disk - Important! →
- 26. Creating A Guest Network - Note →
- 27. Configure Additional Options - Enable Guest Network →
- 28. Aiprotection →
- 29. Network Protection - Configuring Network Protection →
- 30. Important! - Router Security Assessment →
- 31. Malicious Sites Blocking - Two-way Ips →
- 32. Infected Device Prevention And Blocking - Weakness Scan →
- 33. Setting Up Parental Controls - Parental Control Allows You T... →
- 34. Web & Apps Filters - Parental Controls →
- 35. Time Scheduling - To Configure Time Scheduling: →
- 36. Using The Traffic Manager - Managing Qos (quality Of Service... →
- 37. On The User-defined Qos Rules Page, There Are Four Default On... →
- 38. User-defined Priority - Upload Bandwidth →
- 39. Traffic Analyzer →
- 40. Using The Usb Application - Using Aidisk →
- 41. Select The Access Rights That You Want To Assign To The Clie... →
- 42. Using Servers Center - Using Media Server →
- 43. General - Media Services And Servers →
- 44. Follow The Steps Below To Add, Delete, Or Modify An Account.... →
- 45. From The List Of Folders, Select The Type Of Access Permissi... →
- 46. To Use Ftp Share Service: - Using Aidisk →
- 47. G/4g Usb Modems →
- 48. To Set Up 3g/4g Internet Access: - Enable Usb Modem →
- 49. Using Aicloud 2.0 - To Use Aicloud 2.0 →
- 50. Cloud Disk →
- 51. Smart Access - Notes →
- 52. Aicloud Sync →
- 53. Configuring The Advanced Settings - Wireless →
- 54. Note: You Can Assign Unique Ssids For The 2.4 Ghz And 5ghz F... →
- 55. Wpa/wpa2/wpa3 Personal/wpa Auto-personal - Wpa/wpa2/wpa3 Ent... →
- 56. Wps - To Enable Wps On Your Wireless Network: →
- 57. Note: Wps Supports Authentication Using Open System, Wpa-per... →
- 58. Bridge - To Set Up The Wireless Bridge: →
- 59. Hybrid - Connect To Aps In List →
- 60. Wireless Mac Filter - To Set Up The Wireless Mac Filter: →
- 61. Radius Setting - Wpa-enterprise Authentication Mode →
- 62. Professional Screen Provides Advanced Configuration Options.... →
- 63. Set Ap Isolated - Multicast Rate (mbps) →
- 64. Dtim Interval - Beacon Interval →
- 65. Lan - Lan Ip →
- 66. Dhcp Server - Configure The Dhcp Server →
- 67. Domain Name - Ip Pool Starting Address →
- 68. Route - Note →
- 69. Iptv - Configuration Settings →
- 70. Wan - Internet Connection →
- 71. Wan Connection Type - Enable Wan →
- 72. Host Name - Mac Address →
- 73. Port Trigger - To Set Up Port Trigger →
- 74. Trigger Port - Protocol →
- 75. Virtual Server/port Forwarding - Setting Up Port Forwarding →
- 76. Configure - Enable Port Forwarding →
- 77. Local Ip - Local Port →
- 78. Dmz - Setting Up Dmz On A Network →
- 79. Ddns Setup - Enable The Ddns Client →
- 80. Enable Wildcard - Nat Passthrough →
- 81. Ipv6 - To Set Up Ipv6 →
- 82. Firewall - General →
- 83. To Set Up A Url Filter: - Keyword Filter →
- 84. Keyword Filter - Network Services Filter →
- 85. To Set Up A Network Service Filter: - Advanced Settings →
- 86. Administration - Operation Mode →
- 87. System - Change Router Login Password →
- 88. Firmware Upgrade - Restore/save/upload Setting →
- 89. System Log - To View Your System Log: →
- 90. Utilites - Device Discovery →
- 91. Firmware Restoration - Important →
- 92. Set A Static Ip On Your Computer And Use The Following To Se... →
- 93. Note: The Print Server Function Is Supported On Windows Xp, ... →
- 94. Follow The Onscreen Instructions To Set Up Your Hardware, Th... →
- 95. After The Printers Driver Installation Is Complete, Network ... →
- 96. Using Lpr To Share Printer - Sharing Your Lpr Printer →
- 97. Create A New Port - Type Of Port →
- 98. Select Custom Then Click Settings - Set Protocol To Lpr →
- 99. Click Next To Finish Setting Up The Standard Tcp/ip Port. - ... →
- 100. Click Next To Accept The Default Name For The Printer. →
- 101. Download Master - To Use Download Master →
- 102. Use - Configuring Bit Torrent Download Settings →
- 103. Nzb Settings →
- 104. Troubleshooting - Basic Troubleshooting →
- 105. Restart Your Network - Check Ethernet Cable Connections →
- 106. Some Cable Modem Service Providers Require You To Use The Ma... →
- 107. Frequently Asked Questions (faqs) - I Cannot Access The Rout... →
- 108. The Client Cannot Establish A Wireless Connection With The R... →
- 109. Advanced Settings - Wireless →
- 110. Internet Status - Restart Your Network →
- 111. How To Restore The System To Its Default Settings? - Setup A... →
- 112. Firmware Restoration →
- 113. Cannot Access Web Gui - Before Configuring Your Wireless Rou... →
- 114. Mac Os - Windows →
- 115. Ethernet Properties - Internet Protocol Version 4 (tcp/ipv4) →
- 116. Mac Os - Windows →
- 117. Appendices - Gnu General Public License →
- 118. When We Speak Of Free Software, We Are Referring To Freedom,... →
- 119. Terms & Conditions For Copying, Distribution, & Modification... →
- 120. You May Charge A Fee For The Physical Act Of Transferring A ... →
- 121. You May Copy And Distribute The Program (or A Work Based On ... →
- 122. Distribution Of Source Code - Complete Source Code Definitio... →
- 123. License Acceptance - Redistribution Rights →
- 124. Distribution And Use Restrictions - Geographical Distributio... →
- 125. No Warranty - End Of Terms And Conditions →
- 126. Service And Support →