STARLINK Mini Kit Dish With Built In Router User Guide


| MINI SETUP GUIDE

| General | Details |
|---|---|
| Name | STARLINK Mini Kit Dish With Built In Router User Guide |
| Make | Starlink |
| Language | English |
| Filetype | PDF (Download) |
| File size | 0.36 MB |


STARLINK GEN 3 WIFI ROUTER Enhancing Homes Router Installation Guide

UTR-231 Starlink Router User Manual

UTR-232 WiFi 6 Starlink Router Instruction Manual

STARLINK 02633101 Gen 3 Wi-Fi Router User Guide

STARLINK LJ439RBIV3M5 Mini Router Installation Guide

STARLINK Router Installation Guide

STARLINK Mini Kit Dish With Router User Guide

STARLINK Standard Gen 3 Router User Guide

STARLINK Mini Kit Dish With Built In Router User Guide Overview
Summary of Contents
- Page 1: Page 1
- Page 2: What's in the box includes Starlink with integrated WiFi, kickstand, pipe adapter, DC power cable, power supply, Starlink plug, and a 15 m (49.2 ft) cable.
- Page 3: Download the Starlink app and scan the QR code to step through the install process. Your Starlink needs a clear view of the sky so it can stay connected with satellites as they move overhead. Objects that obstruct the connection between your Starlink and the satellite, such as a tree branch, pole, or roof, will cause service interruptions. Use the obstruction tool in the app to ensure you have selected a suitable mounting location. If you could not find a clear field of view from the ground level, consider installing in an elevated location, like a roof, pole, or wall. Additional mounts and accessories are available for purchase on the Starlink Shop.
- Page 4: Plug in Starlink by lifting the kickstand and connecting the provided cable to your Starlink. Ensure the plug is fully inserted. Route the other end of the power cable to your power supply and plug it into a power outlet. On your device, find and connect to the STARLINK network in your WiFi settings. You are now connected. Open the Starlink App to customize additional settings and check your connection. An alert on the App will indicate if you need to rotate Starlink for proper alignment. Use the alignment tool as prompted.
- Page 5: Open the Starlink App to check for any alerts, outages, or obstructions. Check the status light on the back of your Starlink. Make sure everything is securely plugged in and there is no damage to hardware or cables. Power cycle your Starlink by unplugging from power and then plugging back in. Factory reset the Starlink by locating the reset icon on the back. Press down firmly until you hear a click and hold for 3 seconds. The LED will blink quickly and shut off when complete. If none of these work, contact Starlink Customer Support in the app or the Support section of starlink.com.
- Page 6: Remove the Starlink plug. Plug in the Mini Starlink cable or your own ethernet cable into the port. Connect the other end of your cable to your wired mesh or 3rd party hardware. This product is no longer rated IP67 with a standard RJ45 cable.
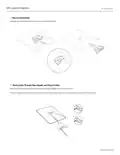
- Page 7: Pipe adapter install Remove kickstand Squeeze the release tab and pull it away from its fixed location. Route cable through pipe adapter and plug in cable Route the Starlink cable through the opening in the pipe adapter and out the front end. Plug the cable into your Starlink and ensure the plug is fully inserted such that the plug face is flush with the surface.
- Page 8: Install pipe adapter by sliding the mount into your Starlink until it clicks into place. Loosen the locking thumbscrew and slide the pipe adapter onto your mounting pipe. Temporarily tighten the thumbscrew to stabilize Starlink onto the pipe. Connect the other end of the Starlink cable to the power supply and plug it into a power outlet.
- Page 9: Pipe adapter install Align your Starlink An alert on the app will show if you need to rotate Starlink to be properly aligned. Click the alert to use the alignment tool. Lock alignment Tighten the thumbscrew on the Pipe Adapter Mount to lock your Starlink in place. Ensure your Starlink is firmly attached.

LINKSYS AX3200 Dual-Band Gigabit Wi-Fi 6 Router User Guide

Shanghai Notion Information Technology M271T LTE Wireless Router User Guide

NETGEAR Nighthawk AX6 6-Stream WiFi Router User Guide

TANGERINE Inseego FX2000 Wavemaker 5G Router User Guide

Mercury Netcomm NF4V Fibre WiFi Gigabit Modem Router User Manual

LINKSYS E2500 Dual Band Router User Guide

DEWERT OKIN FP0809 Portable Travel Hotspot Mini Router Instruction Manual

ASUS EBM68 Tri Band WiFi Router User Guide

LINKSYS WRT54G Wireless G Router Instructions

trend T1ETS Electric Trim Router Instruction Manual