ASUS RT-BE Series Dual Band Wi-Fi Router User Guide

E23051
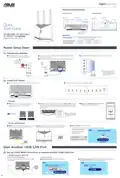
Hardware Explanations
I/O Ports Overview
LED Lights Overview
LAN LEDs
Reset button
2.5G LAN 2-4 ports
2.5G WAN/
LAN 1 port
WAN (Internet)
LED
10G LED
USB LED
2.4GHz LED
5GHz LED
LED button Power switch
WPS button
Power LED
DCIN port
10G WAN/LAN
(Internet) port
Quick
Start Guide
USB 2.0 port
USB 3.2 Gen 1 port
(USB 3.0 port)
RT-BE7D00, RT-BE7D00-1
RT-BE86U, RT-BE6800
BE6800 Dual-band WiFi Router
Specifications:
DC Power adapter
DC Output: +19.5V with 2.31A current
+12V with 5A current
Operating Temperature
Operating Humidity
0~40oC
Storage
Storage
0~70oC
50~90%
20~90%
Router Setup Steps
Prepare your Modem
1
01
Unplug the power of cable / DSL modem. If it
has a battery backup, remove the battery.
2
3
Connect your modem to WAN port at the back side of the router with the
network cable provided.
4
Check the modem LED lights to ensure the connection is active.
Power on the modem. Plug modem to the power outlet and power on.
If you are using DSL for internet,
you will need your username
/ password from your Internet
service provider (ISP) to properly
configure your router.
Modem back
Modem back
Modem front
Install your Router
1
02
Plug the adapter into the DCIN port, and press the Power switch.
2
The power LED will light up when the hardware is ready.
– Via app
3
[App] On your iOS or Android mobile device, go
to the app store, search for ASUS Router, and
download the app.
4
[App] On your iOS or Android mobile device, tap Settings > Wi-Fi, connect
to the default network SSID shown on the product label on the back side of
the router. Or scan the QR code on the product label to connect the default
network SSID.
5
[App] Launch ASUS Router App and follow the
instructions to complete the setup.
ꢀꢁꢂꢃꢄꢅꢁ
ꢆꢇꢈꢃꢉꢊꢋꢌꢍꢁꢎꢌꢁꢍꢊꢏꢁꢍꢇꢐ
ꢀꢁꢂꢃꢄꢅꢆꢇꢀꢈꢉꢁꢇꢊꢋꢋꢌꢍꢎꢏ
ꢐꢋꢑꢋ_ꢒꢒ
* XX refers to the last two digits
of MAC address. You can find
it on the label on the back of
your router.
ꢏꢑꢒꢓꢑ
– Or via web browser
[Wireless] Connect to the network with default SSID shown on
4
[Wired / Wireless] Open a web browser.
3
[Wired] Connect your PC to LAN port at the back side
the product label on the back side of your router “ASUS_XX”.
of the router using an additional network cable.
You will be redirected to the ASUS Setup Wizard. If not, navigate to
ꢓꢂꢔꢎꢈꢕꢂꢅꢄꢈꢅ ꢖꢗꢘꢙꢚꢛꢜ
Follow the instructions to
complete the setup.
ꢀꢁꢂꢃꢄꢂꢅꢃꢅꢆꢂꢇꢅꢆꢂꢄꢇꢈꢁꢉ
ꢊꢋꢌꢃꢍꢎꢂꢋꢅꢏꢂꢄꢄꢐꢍꢑꢒ
Gain Another 10GE LAN Port
Set up 2.5GE WAN connection to release another 10GE LAN Port
01
– Under factory defaults
Connect to the 2.5GE WAN port
Login and Connect
Connect the modem to the 2.5GE WAN port with a
network cable.
1
2
[ASUS Setup Wizard] Select “Manual Setting”.
[ASUS Setup Wizard] Select “2.5G WAN”, then follow the instructions to
complete the setup of SSID and login information.
ꢌꢍꢃꢎꢏꢃꢉꢐꢍꢑꢒꢉꢋꢁꢉꢂꢆꢃꢉꢇꢎꢓꢍꢃꢉꢂꢊꢉꢔꢕ ꢉꢐꢊꢄꢂꢖꢉꢗꢘꢏꢂꢃꢙꢉꢚꢋꢍꢍꢉꢛꢃꢂꢃꢇꢂꢉꢘꢊꢑꢄ
ꢀꢁꢂꢃꢄꢅꢆꢆꢇꢈꢉꢊꢅꢆꢃꢋꢌꢍꢇ
ꢄꢅꢆꢆꢇꢈꢉꢊꢅꢆꢃꢉꢌꢍꢇ
ꢎꢏꢐꢃꢀꢁꢂ
ꢀꢁꢂꢃꢄꢁꢃꢂ
ꢀꢁꢂꢃꢄꢁꢃꢂ
ꢁꢃꢂꢚꢊꢄꢈꢉꢏꢃꢂꢂꢋꢁꢒꢉꢎꢑꢂꢊꢙꢎꢂꢋꢇꢎꢍꢍꢘꢖ
ꢅꢆꢃꢇꢈꢉꢅꢊꢁꢁꢃꢇꢂꢋꢊꢁ
ꢑꢒꢓꢐꢃꢀꢁꢂ
ꢜꢎꢁꢑꢎꢍꢉꢗꢃꢂꢂꢋꢁꢒ
ꢌꢄꢃꢝꢋꢊꢑꢏ

| General | Details |
|---|---|
| Name | ASUS RT-BE Series Dual Band Wi-Fi Router User Guide |
| Make | Asus |
| Language | English |
| Filetype | PDF (Download) |
| File size | 0.64 MB |
 (1 votes, average: 5.00 out of 5)
If you have any questions regarding ASUS RT-BE Series Dual Band Wi-Fi Router User Guide, please ask here and describe the problem in detail.

ASUS RT-AC86U AC2900 WiFi Gaming Router User Guide

ASUS AC1750 WiFi Dual Band Wireless Internet Router User Guide

ASUS TUF-AX5400 Dual Band WiFi 6 Router User Guide

ASUS ET12 ZenWiFi Pro AXE11000 Tri Band Router User Guide

ASUS RT-AX82U V2 AX5400 Dual Band WiFi Router User Guide

ASUS TUF-AX4200 Dual Band WiFi Router User Guide

ASUS RT-N10U 150 mbps Wireless Router Instructions

ASUS RT-BE96U Tri Band WiFi Router User Guide

ASUS GT-AX6000 Dual Band WiFi 6 Extendable Gaming Router User Guide

ASUS RT-BE88U Dual Band WiFi Router User Guide


WIND telecom Surf-i TD-LTE 4G Wireless Router User Manual

DrayTek Vigor2927 Dual-WAN VPN Firewall Router User Manual

NETGEAR PR460X Multi-Gigabit Dual WAN Pro Router Installation Guide

Cudy LT18 4G LTE Router Installation Guide

Enertex KNX IP Secure Router User Manual

MERCURY 6220 Wireless Dual-Band Router Instructions

Juniper NETWORKS SSR120 Router User Guide

XiXi A450L Router Installation Guide

sunhans eSunFi SHFiEL40 eSIM 4G Portable Router User Manual

NORDIC M1R-DH2-12 Corded Router User Manual