FESTOOL OF 1010 REBQ Electric Handheld Router Instructions


English
must be switched off and then switched back on
again.
7.4 Setting the routing depth
The routing depth is set in three steps:
Due to the built-in restart protection, the power
tool cannot be switched on and off via an exter-
nal switch module.
1. Set the zero point, see 7.5.
2. Specify the routing depth, see 7.6.
3. Clamp the routing depth, see 7.7.
Brake
7.5 Setting the zero point
The OF 1010 REBQ has an electronic brake
which brings the spindle with tool to a standstill
within approx. 2 seconds of the tool being
switched off.
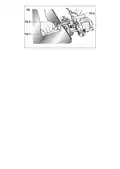
► Release the clamp lever [1-8] so that the
depth stop [1-3] can move freely.
► Position the router with the router ta-
ble [1-1] on a level surface. Open the rotary
knob [1-7] and push the power tool down-
wards until the cutter sits on the surface.
► Clamp the power tool in this position by
closing the rotary knob [1-7].
► Press the depth stop [1-3] against one of
the three fixed stops of the rotatable step-
ped stop [1-2].
7.2 Changing tools
CAUTION
Risk of injury from hot and sharp insertion
tool
► Do not use any blunt or faulty insertion
tools.
► Wear protective gloves when handling an
insertion tool.
A hex key can be used to individually adjust the
height of each fixed stop.
► Push the indicator [1-10] downwards so
To change tools, place the power tool on its
side.
that it points to 0 mm on the scale.
If the zero position is incorrect, this can be
corrected using the screw on the indica-
tor [1-10].
Inserting the tool
► Insert the routing tool into the open collet
as far as possible or at least up to the
7.6 Specifying the routing depth
mark
on the router shank.
The required routing depth can be specified us-
ing either quick depth adjustment or fine depth
adjustment.
► Turn the spindle until the spindle stop [1-6]
engages when pressing and the spindle
locks.
► Tighten the nut [1-5] using an open ended
spanner (WAF 19).
Quick depth adjustment
► Pull the depth stop [1-3] upwards until the
indicator [1-10] points to the required rout-
ing depth.
► Clamp the depth stop in this position using
the clamp lever [1-8].
Removing the tool
► Turn the spindle until the spindle stop [1-6]
engages when pressing and the spindle
locks.
► Undo the nut [1-5] using an open ended
spanner (WAF 19) until you can feel resist-
ance. Overcome the resistance by continu-
ing to turn the open ended spanner.
► Remove the router.
Fine depth adjustment
► Clamp the depth stop using the clamp lev-
er [1-8].
► Set the required routing depth by turning
the adjusting wheel [1-9].
7.3 Changing the collets
Turning the adjusting wheel by a mark
changes the routing depth by 0.1 mm. A
full rotation changes the routing depth by
1 mm. The maximum adjustment range for
the adjusting wheel is 8 mm.
Collets are available for the following shaft di-
ameters: 6.0 mm; 6.35 mm; 8.0 mm (See
Festool catalogue or online at www.festool.com
for the order numbers)
► Completely unscrew the nut [1-5] and re-
move it together with the collet.
7.7 Clamping the routing depth
► Only insert a new collet into the spindle if a
nut is fitted and engaged.
► Gently screw in the nut. Do not tighten the
nut if no cutter is inserted.
► Open the rotary knob [1-7] and push the
power tool down until the depth stop touch-
es the fixed stop.
► Clamp the power tool in this position by
closing the rotary knob [1-7].
18
| General | Details |
|---|---|
| Name | FESTOOL OF 1010 REBQ Electric Handheld Router Instructions |
| Make | FESTOOL |
| Language | English |
| Filetype | PDF (Download) |
| File size | 2.81 MB |

If you have any questions regarding FESTOOL OF 1010 REBQ Electric Handheld Router Instructions, please ask here and describe the problem in detail.

FESTOOL OF 1400 EB Router User Manual


westermo MRD-455-NA Cellular Router User Guide

motorola Cable Modem Plus N450 Router User Guide

ASUS ZenWiFi XD4S AX1800 Dual Band WiFi Router User Guide

MOXA TN-4900 Series Gigabit Security Router Owner’s Manual

SMAWAVE SRP620-B 5G IP67 Ruggedized Router User Guide

cradlepoint PepWave MAX BR1 Pro 5G Mobile Router User Guide

TP-Link Archer AXE300 Quad-Band Wi-Fi 6E Router Installation Guide

D LINK R15 Router using Eagle Pro AI App User Guide

netgate 6100 MAX Secure Router User Manual

xiaomi AX1500 Router User Manual