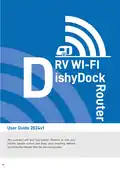
RV Wi-Fi 2024v1 DishyDock Router User Guide


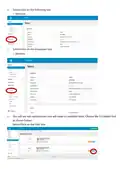


Installing your RV Wi-Fi DishyDock Router
Position your router next to the internal DishyDock
Port, DishyDock Power and a double 12volt power
1
socket.
Screw the 4 x Wi-Fi antenna’s into the Wi-Fi ports on
the control Panel.
2
NB: the ports top and bottom are for the upgradable RV WIF
5G router.
IMPORTANT: plug the ethernet cable labelled ‘BLUE
WAN PORT ’into the BLUE WAN PORT on the side
3
panel of the router. DO NOT put this cable into the
YELLOW LAN PORTS of the router.
Insert opposite end of the ethernet cable into RV
WIFI DishyDock Power.
4
Insert into the port labelled‘DishyDock Router’.
Insert the 12 volt power adapter into power jack o
5
the side panel of the RV Wi-Fi DishyDock Router.
Insert the power cord into 12v power point turn
on.
6
NB: This unit is not to be hardwired unless discussed with an
RV WIFI represenative first.
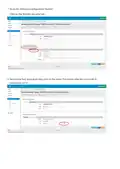
Turning on your RV Wi-Fi DishyDock Router
Place the end of the power adapter into
1
the ‘Power’slot.
| General | Details |
|---|---|
| Name | RV Wi-Fi 2024v1 DishyDock Router User Guide |
| Make | RV Wi-Fi |
| Language | English |
| Filetype | PDF (Download) |
| File size | 0.46 MB |
 (1 votes, average: 5.00 out of 5)
If you have any questions regarding RV Wi-Fi 2024v1 DishyDock Router User Guide, please ask here and describe the problem in detail.

RV WI-FI 2024 V3 DishyDock Router User Manual


GL-INET GL-AR300M Shadow Mini Router User Guide

Helmholz LTE11 Router Owner’s Manual

NETGEAR RS300S Nighthawk Tri Band WiFi 7 Router Instructions

MEIG SRT838iPro 5G CPE WiFi Router User Manual

Wi-Tek WI-LTE300 Wireless 4G LTE Router Installation Guide

STRONG 5GROUTERAX3000 5G Router Instructions

Cudy LT500 4G LTE AC1200 Dual Band WiFi Router User Guide

xiaomi RA67 AX1800 Mi Router User Manual

Mercury NF18ACV-NC2-R6B023 Netcomm WiFi Router User Guide
Cradlepoint E102 Series Enterprise Router User Guide