×
- 1. Get To Know Your Device (Connect Your Device → Log In To Your Device → Use Quick Setup Wizard → Manually Set Up Your Internet Connection → Create Mesh Wi-fi System)
- 2. About This Guide (Position The Device → Connect Your Device → Use Quick Setup Wizard → Configure The Device In Router Mode → Connect The Hardware → Manually Set Up Your Internet Connection)
- 3. Change The Lan Ip Address (Use The Controller As A Dhcp Server → Configure Ipv6 Lan Settings → Set Up A Dynamic Dns Service Account → Create Static Routes → Update The Firmware → Change The Login Password)
- 4. User Guide
- 5. About This Guide (Connect The Device → Log In To Your Device → Set Up Internet Connection → Create Mesh Wi-fi System → Multi-ssid → Tp-link Cloud Service)
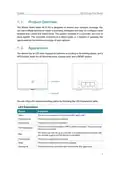
- 6. Get To Know Your Device (Product Overview → Appearance)
- 7. Get To Know Your Device (Product Overview → Appearance → Led Explanation)
- 8. Get To Know Your Device (Led Explanation → Status → Wps Button → Power Port → Wan/lan Port → Lan1, Lan2 Ports)
- 9. Connect The Device (Position The Device → Connect Your Device)
- 10. Connect The Device (Position The Device → Connect Your Device → Router Mode Configure The Device In Router Mode)
- 11. Connect The Device (Internet → Power Adapter → Wan/lan → Wired Router → Method 1: Wired → Method 2: Wireless)
- 12. Connect The Device (Computer → Smart Device → Settings → Wi-fi → Wireless Network Connection → Note:)
- 13. Log In To Your Device
- 14. Log In To Your Device (Set Up The Tcp/ip Protocol → Launch A Web Browser → Create A Strong Login Password → If The Dialog Boxes Do Not Appear → If The Login Window Does Not Appear)
- 15. Set Up Internet Connection (Use Quick Setup Wizard → Configure The Device In Router Mode)
- 16. Set Up Internet Connection (Use Quick Setup Wizard → Configure The Device In Router Mode → Connect The Hardware → Set Up An Ipv6 Internet Connection)
- 17. Set Up Internet Connection (Manually Set Up Your Internet Connection → Check Or Modify Internet Connection Settings → Select Your Internet Connection Type → Consult Your Isp → Follow The Instructions For Configuration → Save Settings For Dynamic Ip)
- 18. Set Up Internet Connection (Static Ip → Pppoe → L2tp → Dns Address Mode)
- 19. Set Up Internet Connection (Set Up An Ipv6 Internet Connection)
- 20. Set Up Internet Connection (Set Up The Ipv6 Tunnel → Addressing Type → Ipv6 Gateway)
- 21. Create Mesh Wi-fi System
- 22. Create Mesh Wi-fi System (To Add An Agent To Your Network → Method 1: Wireless Connection → Method 2: Wired Connection)
- 23. Create Mesh Wi-fi System (Tips: → Synchronizing Process → Managing Your Mesh Network → Placement Of The Agent → Led Status Indicators)
- 24. Multi-ssid (Warning: Ensure Network Security And Privacy → Creating A Multi-ssid Wireless Network → Customizing Network Settings → Providing Wi-fi Access For Visitors)
- 25. Multi-ssid (Create The Multi-ssid Network → Enable Check Box → Network Name (ssid) → Hide Ssid → Security Option → Click Save)
- 26. Register A Tp-link Id (Change Your Tp-link Id Information → Manage The User Tp-link Ids → Manage The Router Via The Tp-link Tether App)
- 27. Register A Tp-link Id (Change Your Tp-link Id Information)
- 28. Tp-link Cloud Service (Manage The User Tp-link Ids)
- 29. Tp-link Cloud Service (Add Tp-link Id To Manage The Router → Remove Tp-link Id(s) From Managing The Router)
- 30. Manage The Router Via The Tp-link Tether App (Launch The Apple App Store Or Google Play Store → Connect Your Device To The Routers Wireless Network → Log In With Your Tp-link Id → Register A Tp-link Id)
- 31. Easymesh With Seamless Roaming
- 32. Easymesh With Seamless Roaming (Same Network Name & Password → Unified Wi-fi Network → Seamless Roaming → Easy Setup And Management → To Set Up A Easymesh Network)
- 33. Easymesh With Seamless Roaming (Add Mesh Device → Setup Instructions → New Ap Device → Mesh Device To Be Added → Easymesh Network → Network Map Page)
- 34. Parental Controls
- 35. Parental Controls (Visit Http://tplinkwifi.net, And Log In With The Password You Set For The Controller. → Go To Basic Or Advanced > Parental Controls And Enable Parental Controls. → Click Add, And Then Click View Existing Devices To Select The Connected Device(s) To Be Controlled. → Click The Icon To Set The Effective Time.)
- 36. Parental Controls (Enable This Entry → Content Restriction → Whitelist → Blacklist → Add A New Keyword)
- 37. Parental Controls (Whitelist → Blacklist)
- 38. Network Security (Firewall & Dos Protection → Service Filtering → Access Control → Ip & Mac Binding)
- 39. Network Security (Firewall & Dos Protection → Dos Protection Configuration → Traffic Statistics → Protection Level Settings)
- 40. Network Security (Service Filtering)
- 41. Network Security (Access Control)
- 42. Network Security (Select The Access Mode To Either Block (recommended) Or Allow The Device(s) To Access Your Network. → To Block Specific Device(s): → To Allow Specific Device(s):)
- 43. Network Security (Ip & Mac Binding → Blacklist Or Whitelist → Prevent Arp Spoofing And Arp Attacks)
- 44. Network Security (Bind Your Device(s) According To Your Needs → Bind The Connected Device(s) → Bind The Unconnected Device)
- 45. Nat Forwarding (Translate Address And Port By Alg → Share Local Resources Over The Internet By Virtual Server → Open Ports Dynamically By Port Triggering → Make Applications Free From Port Restriction By Dmz → Make Xbox Online Games Run Smoothly By Upnp)
- 46. Nat Forwarding (Translate Address And Port By Alg → Pptp Pass-through → L2tp Pass-through → Ipsec Pass-through → Ftp Alg → Tftp Alg)
- 47. Nat Forwarding (Virtual Server → Assign A Static Ip Address To Your Pc → Visit Http://tplinkwifi.net → Go To Advanced > Nat Forwarding > Virtual Servers)
- 48. Nat Forwarding (Open Ports Dynamically By Port Triggering → Set Up A Dynamic Dns Service Account)
- 49. Nat Forwarding (Port Triggering → Make Applications Free From Port Restriction By Dmz)
- 50. Nat Forwarding (Dmz Configuration → Assign A Static Ip Address → Enable Dmz → Save Settings → Upnp Configuration → Make Xbox Online Games Run Smoothly)
- 51. Nat Forwarding (Upnp Configuration → Tips For Upnp Usage → Connecting Xbox For Online Gaming → Enabling Or Disabling Upnp)
- 52. Vpn Server (Use Openvpn To Access Your Home Network → Use Pptp Vpn To Access Your Home Network)
- 53. Useopenvpntoaccessyourhomenetwork (Setupopenvpnserveronyourcontroller → Enablevpnserver → Configuredynamicdnsservice → Generateacertificate → Selectservicetype → Enteravpnserviceport)
- 54. Vpn Server (Configure Openvpn Connection On Your Remote Device → Use Pptp Vpn To Access Your Home Network → Set Up Pptp Vpn Server On Your Controller)
- 55. Vpn Server (Configure Pptp Vpn Connection On Your Remote Device → Dynamic Dns Service → Client Ip Address → Username And Password → Save)
- 56. Vpn Server
- 57. Vpn Server
- 58. Vpn Server
- 59. Customize Your Network Settings (Change Lan Settings → Configure Ipv6 Lan Settings → Set Up A Dynamic Dns Service Account → Create Static Routes → Set Up The Ipv6 Tunnel → Specify Wireless Settings)
- 60. Customizeyournetworksettings (Changelansettings → Changethelanipaddress → Usethecontrollerasadhcpserver)
- 61. Customizeyournetworksettings (Configuredhcpserver → Enabledhcpfunction → Specifyipaddresspool → Enteraddressleasetime → Reservelanipaddresses)
- 62. Customizeyournetworksettings (Configureipv6lansettings → Configuretheradvdaddresstype → Addressreservation → Macaddress → Specifytheipaddress → Enablethisentry)
- 63. Customizeyournetworksettings (Configurethedhcpv6serveraddresstype)
- 64. Customizeyournetworksettings (Setupadynamicdnsserviceaccount)
- 65. Customizeyournetworksettings (Createstaticroutes)
- 66. Customize Your Network Settings (Make Sure The Routers Use Different Lan Ip Addresses On The Same Subnet. Disable Router Bs Dhcp Function. → Visit Http://tplinkwifi.net, And Log In With The Password You Set For Router A. → Go To Advanced > Network > Static Routing. Select Your Current Wan Interface And Click Save. → Click Add To Add A New Static Routing Entry. Finish The Settings According To The Following Explanations:)
- 67. Customizeyournetworksettings (Networkdestination → Subnetmask → Gateway → Interface → Enablethisentry → Save)
- 68. Customizeyournetworksettings (Setuptheipv6tunnel → Usethepublicipv6tunnelservice-6to4)
- 69. Customizeyournetworksettings (Specifythe6rdtunnelwithparametersprovidedbyyourisp → Enableipv6tunnel → Chooseautoormanual → Clicksave → Visitipv6websiteswiththe6rdtunnel → Setupds-liteandmap-ttunnel)
- 70. Customizeyournetworksettings (Specifywirelesssettings → Changebasicwirelesssettings → Enableordisablewirelessfunction → Changewirelessnetworknameandpassword → Hidessid → Enableordisablebandsteering)
- 71. Customizeyournetworksettings (Mode → Channel → Channelwidth → Tochange The Securityoption)
- 72. Customizeyournetworksettings (Viewwirelessinformation)
- 73. Customizeyournetworksettings (Advancedwirelesssettings → Wirelessstatistics → Beaconinterval → Rtsthreshold → Dtiminterval → Groupkeyupdateperiod)
- 74. Customizeyournetworksettings (Usewpsforwirelessconnection → Wmm → Shortgi → Apisolation → Airtimefairness → Fastroaming(802.11r))
- 75. Customizeyournetworksettings (Enablewps → Enterthecontrollerspinonyourclientdevice → Entertheclientdevicespinonthecontroller → Wpssettings → Note)
- 76. Customizeyournetworksettings (Connectsuccessfullywillappearaftertheconnectbutton,whichmeanstheclientdevicehassuccessfullyconnectedtothecontroller.)
- 77. Set System Time (Test Internet Connectivity → Update The Firmware → Back Up And Restore Configuration Settings → Administration Management → System Log → Cwmp Settings)
- 78. Set System Time (Configure The System Time Using The Following Methods → Manually → Get From Pc → Get From The Internet → Enable Daylight Saving Time)
- 79. Controlled (Testinternetconnectivity)
- 80. Manage Your Controller (Update The Firmware → Back Up Your Controller Configuration Before Upgrading The Firmware → Do Not Turn Off The Controller During The Firmware Upgrade → Download The Latest Firmware File For The Controller → Log In With The Password You Set For The Controller → Go To Advanced > System Tools > Firmware Upgrade)
- 81. Back Up And Restore Configuration Settings (Upgrade Firmware → Reset The Controller To Factory Default Settings → Restore Configuration Settings → Backup Configuration Settings)
- 82. Manageyourcontroller (Rebootthecontroller → Warning → Note)
- 83. Manageyourcontroller (Administrationmanagement → Changetheloginpassword → Localmanagement)
- 84. Enablemanagementoverhttps (Remotemanagement)
- 85. Manage Your Controller (Enable Remote Management And Remote Management Via Https → Set The Client Device Allowed For Remote Management → Save → Icmp Ping)
- 86. Manageyourcontroller (Icmpping → Systemlog → Savelog → Viewsystemlogs → Remoteping → Localping)
- 87. Manage Your Controller (Cwmp Settings)
- 88. Manageyourcontroller (Cwmp → Inform → Informdatamodelwithtr098 → Informinterval → Acsurl → Acsusername/password)
- 89. Manage Your Controller (Snmp Settings → Path → Port → Url → Stun → Stun Server Address/port → Minimum/maximum Keep Alive Period)
- 90. Enablesnmpagent/snmpagentforwan (Read-onlycommunity → Writecommunity → Systemname → Systemdescription → Systemlocation → Systemcontact)
- 91. Manage Your Controller (Enable Traffic Statistics → Traffic Statistics List)
- 92. Default Wireless Password (Resetting Web Management Password → Logging Into The Controller's Web Management Page → Connecting To The Controller → Configuring Ip Address Settings → Checking Computer Settings → Reconfiguring The Controller After Reset)
- 93. Lan Settings (Advanced → Restore Advanced Settings)
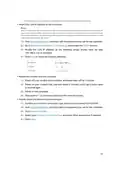
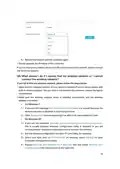
- 94. Use Another Web Browser Or Computer To Log In Again. (Reset The Controller To Factory Default Settings And Try Again. → Note: Youll Need To Reconfigure The Controller To Access The Internet Once The Controller Is Reset. → Visit Http://tplinkwifi.net, And Log In With The Password You Set For The Controller. → Go To Advanced > Status To Check Internet Status.)
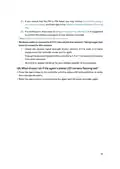
- 95. Configure The Dns Server (Restart The Modem And The Controller → Reset The Controller To Factory Default Settings And Reconfigure The Controller → Upgrade The Firmware Of The Controller)
- 96. Check The Tcp/ip Settings (Make Sure The Physical Connection Between The Controller And The Modem Is Proper → Clone The Mac Address Of Your Computer → Visit Http://tplinkwifi.net And Log In With The Password You Set For The Controller → Go To Advanced > Network > Internet And Click The Edit Icon To Find The Mac Clone Section → Choose An Option As Needed And Click Ok → Some Isp Will Register The Mac Address Of Your Computer When You Access The Internet For The First Time)
- 97. Modifythelanipaddressofthecontroller (Restartthemodemandthecontroller → Doublechecktheinternetconnectiontype)
- 98. Restart The Modem And The Controller (Upgrade The Firmware Of The Controller → Troubleshooting Wireless Network Connection Issues → Ensure Wireless Function Is Enabled → Check Wireless Adapter Driver Installation → Windows 7 Connection Troubleshooting → Windows Xp Connection Troubleshooting)
- 99. Right Click Wireless Zero Configuration And Then Select Properties (Change Startup Type To Automatic → Check The Wlan Led Indicator On Your Wireless Controller/modem → Make Sure Your Computer/device Is Still In The Range Of Your Controller/modem → Go To Advanced > Wireless > Wireless Settings → Double Check Your Wireless Network Name And Ssid Is Not Hidden → Authenticating Problem/password Mismatch)
- 100. Connecting Using A Security Key Instead (Wireless Password/network Security Key Is Case Sensitive → Check The Wireless Signal Strength Of Your Network → Change The Wireless Channel Of The Controller → Re-install Or Update The Driver For Your Wireless Adapter → Place The Agent Close To The Controller → Reset The Agent And Try To Synchronize The Agent With The Mesh Controller Again)
- 101. Fcc Compliance Information Statement (Product Name: Ax1800 Whole Home Mesh Wi-fi Ap → Model Number: Hx220-g5/hx220 → Responsible Party: Tp-link Usa Corporation → This Equipment Has Been Tested And Found To Comply With The Limits For A Class B Digital Device, Pursuant To Part 15 Of The Fcc Rules.)
- 102. Fcc Rf Radiation Exposure Statement (Mobile Configurations → Antenna Installation Requirements → Separation Distance Requirements → Compliance With Fcc Part 15 → Unauthorized Modifications → Equipment Maintenance And Operation)
- 103. Ukca Declaration Of Conformity (National Restrictions → Canadian Compliance Statement → Caution)
- 104. Radiationexposurestatement (Industrycanadastatement → Koreawarningstatements → Nccnotice → Bsminotice)
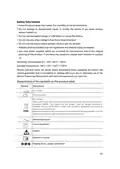
- 105. Safety Information (Operating Temperature → Storage Temperature → Explanations Of The Symbols On The Product Label → Caution)
×
TP-Link AX1800 Wireless Router User Manual
Chapter 2
Connect the Device
2. 1. Position the Device
ꢀ The device should not be located in a place where it will be exposed to moisture or
excessive heat.
ꢀ Place the device in a location where it can be connected to multiple devices as well as
to a power source.
ꢀ Make sure the cables and power cord are safely placed out of the way so they do not
create a tripping hazard.
ꢀ Keep the device away from devices with strong electromagnetic interference, such
as Bluetooth devices, cordless phones and microwaves.
ꢀ The device can be placed on a shelf or desktop.
Generally, the device is placed on a horizontal surface, such as on a shelf or desktop.
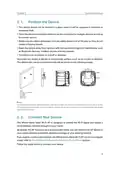
The device also can be mounted on the wall as shown in the following image.
40
n 4.5
3
1.8
n 10
NOTE:
4.67 mm < D < 9.85 mm
d < 4.5 mm
H < 3 mm
4.8 mm < N
ꢃꢂꢄPPꢄƩꢄ0
Note:
The diameter of the screw should be between 4.67 mm and 9.85 mm, and the center distance of two screws is 40 mm.
The screws should be at least 20 mm in length to hold the device, and the screw head raised above the wall surface
should be about 4.8 mm.
2. 2. Connect Your Device
The Whole Home Mesh Wi-Fi AP is designed to extend the Wi-Fi signal and create a
mesh wireless network throughout your home.
By default, the AP device is set in access point mode, you can connect the AP device to
your exiting wired to extend the wireless coverage of your existing network.
If you want to create a new network, the Whole Home Mesh Wi-Fi AP can act as a regular
router, refer to Router Mode Configure the Device in Router Mode section.
Follow the steps below to connect your device.
6
| General | Details |
|---|---|
| Name | TP-Link AX1800 Wireless Router User Manual |
| Make | TP-Link |
| Language | English |
| Filetype | PDF (Download) |
| File size | 1.49 MB |
If you have any questions regarding TP-Link AX1800 Wireless Router User Manual, please ask here and describe the problem in detail.

TP-Link VR300 Archer Modem Router User Guide

TP-Link T150500-2-DT WiFi Router Instruction Manual

TP-Link Archer AX55 Wi-Fi 6 Router Installation Guide

TP-Link Omada ER8411 VPN Router Instructions

TP-Link Configure VDSL Router User Guide

TP-Link Archer BE805 BE19000 Tri-Band Wi-Fi 7 Router User Manual

TP-Link VR600 Wireless DSL Modem Router Installation Guide

TP-Link AX58 Dual Band Gigabit Wi-Fi 6 Router Installation Guide

TP-Link AC750 Wireless Dual Band Router Owner’s Manual

TP-Link AX6000 8-Stream Wi-Fi 6 Router Installation Guide


GL iNet X3000NR 5G NR Wi-Fi 6 Router User Guide

CISCO cBR Series Converged Broadband Router User Guide

PROSCEND 850G-6PI 6 Port GbE Managed PoE Switch 5G Cellular Router Installation Guide

Ruijie RG-EW1800GX(PRO) Wi-Fi 6 Dual Band Router Installation Guide

CASTLENET EBM552U Mesh Wi-Fi Router Installation Guide

BEC RidgeWave 7000 R26 MaxRange Gigabit LTE Outdoor Router Owner’s Manual

ELPRO 641M-X Iot Connectivity 4g-Lte Router User Manual

Shenzhen Xinfengweiye Technology U850 4G Wireless Router User Manual

ASKEY MAX2V1K Charter WiFi 6E MDU Router User Guide

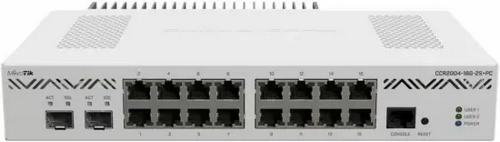
Getic MikroTik CCR2004-16G-2S+PC Cloud Core Router User Manual
Table of Contents
- 1. Get To Know Your Device - Connect Your Device →
- 2. About This Guide - Position The Device →
- 3. Change The Lan Ip Address - Use The Controller As A Dhcp Ser... →
- 4. User Guide →
- 5. About This Guide - Connect The Device →
- 6. Get To Know Your Device - Product Overview →
- 7. Get To Know Your Device - Product Overview →
- 8. Get To Know Your Device - Led Explanation →
- 9. Connect The Device - Position The Device →
- 10. Connect The Device - Position The Device →
- 11. Connect The Device - Internet →
- 12. Connect The Device - Computer →
- 13. Log In To Your Device →
- 14. Log In To Your Device - Set Up The Tcp/ip Protocol →
- 15. Set Up Internet Connection - Use Quick Setup Wizard →
- 16. Set Up Internet Connection - Use Quick Setup Wizard →
- 17. Set Up Internet Connection - Manually Set Up Your Internet C... →
- 18. Set Up Internet Connection - Static Ip →
- 19. Set Up Internet Connection - Set Up An Ipv6 Internet Connect... →
- 20. Set Up Internet Connection - Set Up The Ipv6 Tunnel →
- 21. Create Mesh Wi-fi System →
- 22. Create Mesh Wi-fi System - To Add An Agent To Your Network →
- 23. Create Mesh Wi-fi System - Tips: →
- 24. Multi-ssid - Warning: Ensure Network Security And Privacy →
- 25. Multi-ssid - Create The Multi-ssid Network →
- 26. Register A Tp-link Id - Change Your Tp-link Id Information →
- 27. Register A Tp-link Id - Change Your Tp-link Id Information →
- 28. Tp-link Cloud Service - Manage The User Tp-link Ids →
- 29. Tp-link Cloud Service - Add Tp-link Id To Manage The Router →
- 30. Manage The Router Via The Tp-link Tether App - Launch The Ap... →
- 31. Easymesh With Seamless Roaming →
- 32. Easymesh With Seamless Roaming - Same Network Name & Passwor... →
- 33. Easymesh With Seamless Roaming - Add Mesh Device →
- 34. Parental Controls →
- 35. Parental Controls - Visit Http://tplinkwifi.net, And Log In ... →
- 36. Parental Controls - Enable This Entry →
- 37. Parental Controls - Whitelist →
- 38. Network Security - Firewall & Dos Protection →
- 39. Network Security - Firewall & Dos Protection →
- 40. Network Security - Service Filtering →
- 41. Network Security - Access Control →
- 42. Network Security - Select The Access Mode To Either Block (r... →
- 43. Network Security - Ip & Mac Binding →
- 44. Network Security - Bind Your Device(s) According To Your Nee... →
- 45. Nat Forwarding - Translate Address And Port By Alg →
- 46. Nat Forwarding - Translate Address And Port By Alg →
- 47. Nat Forwarding - Virtual Server →
- 48. Nat Forwarding - Open Ports Dynamically By Port Triggering →
- 49. Nat Forwarding - Port Triggering →
- 50. Nat Forwarding - Dmz Configuration →
- 51. Nat Forwarding - Upnp Configuration →
- 52. Vpn Server - Use Openvpn To Access Your Home Network →
- 53. Useopenvpntoaccessyourhomenetwork - Setupopenvpnserveronyour... →
- 54. Vpn Server - Configure Openvpn Connection On Your Remote Dev... →
- 55. Vpn Server - Configure Pptp Vpn Connection On Your Remote De... →
- 56. Vpn Server →
- 57. Vpn Server →
- 58. Vpn Server →
- 59. Customize Your Network Settings - Change Lan Settings →
- 60. Customizeyournetwork... - Changelansettings →
- 61. Customizeyournetwork... - Configuredhcpserver →
- 62. Customizeyournetwork... - Configureipv6lansett... →
- 63. Customizeyournetworksettings - Configurethedhcpv6serveraddre... →
- 64. Customizeyournetworksettings - Setupadynamicdnsserviceaccoun... →
- 65. Customizeyournetwork... - Createstaticroutes →
- 66. Customize Your Network Settings - Make Sure The Routers Use ... →
- 67. Customizeyournetwork... - Networkdestination →
- 68. Customizeyournetwork... - Setuptheipv6tunnel →
- 69. Customizeyournetworksettings - Specifythe6rdtunnelwithparame... →
- 70. Customizeyournetwork... - Specifywirelesssetti... →
- 71. Customizeyournetwork... - Mode →
- 72. Customizeyournetwork... - Viewwirelessinformat... →
- 73. Customizeyournetwork... - Advancedwirelesssett... →
- 74. Customizeyournetwork... - Usewpsforwirelesscon... →
- 75. Customizeyournetwork... - Enablewps →
- 76. Customizeyournetworksettings - Connectsuccessfullywillappear... →
- 77. Set System Time - Test Internet Connectivity →
- 78. Set System Time - Configure The System Time Using The Follow... →
- 79. Controlled - Testinternetconnecti... →
- 80. Manage Your Controller - Update The Firmware →
- 81. Back Up And Restore Configuration Settings - Upgrade Firmwar... →
- 82. Manageyourcontroller - Rebootthecontroller →
- 83. Manageyourcontroller - Administrationmanage... →
- 84. Enablemanagementover... - Remotemanagement →
- 85. Manage Your Controller - Enable Remote Management And Remote... →
- 86. Manageyourcontroller - Icmpping →
- 87. Manage Your Controller - Cwmp Settings →
- 88. Manageyourcontroller - Cwmp →
- 89. Manage Your Controller - Snmp Settings →
- 90. Enablesnmpagent/snmp... - Read-onlycommunity →
- 91. Manage Your Controller - Enable Traffic Statistics →
- 92. Default Wireless Password - Resetting Web Management Passwor... →
- 93. Lan Settings - Advanced →
- 94. Use Another Web Browser Or Computer To Log In Again. - Reset... →
- 95. Configure The Dns Server - Restart The Modem And The Control... →
- 96. Check The Tcp/ip Settings - Make Sure The Physical Connectio... →
- 97. Modifythelanipaddressofthecontroller - Restartthemodemandthe... →
- 98. Restart The Modem And The Controller - Upgrade The Firmware ... →
- 99. Right Click Wireless Zero Configuration And Then Select Prop... →
- 100. Connecting Using A Security Key Instead - Wireless Password/... →
- 101. Fcc Compliance Information Statement - Product Name: Ax1800 ... →
- 102. Fcc Rf Radiation Exposure Statement - Mobile Configurations →
- 103. Ukca Declaration Of Conformity - National Restrictions →
- 104. Radiationexposuresta... - Industrycanadastatem... →
- 105. Safety Information - Operating Temperature →