
×
- 1. Get To Know Your Device (Connect Your Device → Log In To Your Device → Use Quick Setup Wizard → Manually Set Up Your Internet Connection → Create Mesh Wi-fi System)
- 2. About This Guide (Position The Device → Connect Your Device → Use Quick Setup Wizard → Configure The Device In Router Mode → Connect The Hardware → Manually Set Up Your Internet Connection)
- 3. Change The Lan Ip Address (Use The Controller As A Dhcp Server → Configure Ipv6 Lan Settings → Set Up A Dynamic Dns Service Account → Create Static Routes → Update The Firmware → Change The Login Password)
- 4. User Guide
- 5. About This Guide (Connect The Device → Log In To Your Device → Set Up Internet Connection → Create Mesh Wi-fi System → Multi-ssid → Tp-link Cloud Service)
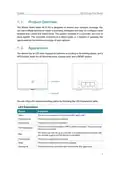
- 6. Get To Know Your Device (Product Overview → Appearance)
- 7. Get To Know Your Device (Product Overview → Appearance → Led Explanation)
- 8. Get To Know Your Device (Led Explanation → Status → Wps Button → Power Port → Wan/lan Port → Lan1, Lan2 Ports)
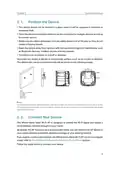
- 9. Connect The Device (Position The Device → Connect Your Device)
- 10. Connect The Device (Position The Device → Connect Your Device → Router Mode Configure The Device In Router Mode)
- 11. Connect The Device (Internet → Power Adapter → Wan/lan → Wired Router → Method 1: Wired → Method 2: Wireless)
- 12. Connect The Device (Computer → Smart Device → Settings → Wi-fi → Wireless Network Connection → Note:)
- 13. Log In To Your Device
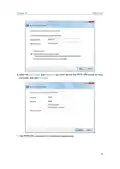
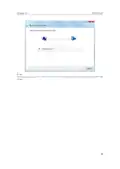
- 14. Log In To Your Device (Set Up The Tcp/ip Protocol → Launch A Web Browser → Create A Strong Login Password → If The Dialog Boxes Do Not Appear → If The Login Window Does Not Appear)
- 15. Set Up Internet Connection (Use Quick Setup Wizard → Configure The Device In Router Mode)
- 16. Set Up Internet Connection (Use Quick Setup Wizard → Configure The Device In Router Mode → Connect The Hardware → Set Up An Ipv6 Internet Connection)
- 17. Set Up Internet Connection (Manually Set Up Your Internet Connection → Check Or Modify Internet Connection Settings → Select Your Internet Connection Type → Consult Your Isp → Follow The Instructions For Configuration → Save Settings For Dynamic Ip)
- 18. Set Up Internet Connection (Static Ip → Pppoe → L2tp → Dns Address Mode)
- 19. Set Up Internet Connection (Set Up An Ipv6 Internet Connection)
- 20. Set Up Internet Connection (Set Up The Ipv6 Tunnel → Addressing Type → Ipv6 Gateway)
- 21. Create Mesh Wi-fi System
- 22. Create Mesh Wi-fi System (To Add An Agent To Your Network → Method 1: Wireless Connection → Method 2: Wired Connection)
- 23. Create Mesh Wi-fi System (Tips: → Synchronizing Process → Managing Your Mesh Network → Placement Of The Agent → Led Status Indicators)
- 24. Multi-ssid (Warning: Ensure Network Security And Privacy → Creating A Multi-ssid Wireless Network → Customizing Network Settings → Providing Wi-fi Access For Visitors)
- 25. Multi-ssid (Create The Multi-ssid Network → Enable Check Box → Network Name (ssid) → Hide Ssid → Security Option → Click Save)
- 26. Register A Tp-link Id (Change Your Tp-link Id Information → Manage The User Tp-link Ids → Manage The Router Via The Tp-link Tether App)
- 27. Register A Tp-link Id (Change Your Tp-link Id Information)
- 28. Tp-link Cloud Service (Manage The User Tp-link Ids)
- 29. Tp-link Cloud Service (Add Tp-link Id To Manage The Router → Remove Tp-link Id(s) From Managing The Router)
- 30. Manage The Router Via The Tp-link Tether App (Launch The Apple App Store Or Google Play Store → Connect Your Device To The Routers Wireless Network → Log In With Your Tp-link Id → Register A Tp-link Id)
- 31. Easymesh With Seamless Roaming
- 32. Easymesh With Seamless Roaming (Same Network Name & Password → Unified Wi-fi Network → Seamless Roaming → Easy Setup And Management → To Set Up A Easymesh Network)
- 33. Easymesh With Seamless Roaming (Add Mesh Device → Setup Instructions → New Ap Device → Mesh Device To Be Added → Easymesh Network → Network Map Page)
- 34. Parental Controls
- 35. Parental Controls (Visit Http://tplinkwifi.net, And Log In With The Password You Set For The Controller. → Go To Basic Or Advanced > Parental Controls And Enable Parental Controls. → Click Add, And Then Click View Existing Devices To Select The Connected Device(s) To Be Controlled. → Click The Icon To Set The Effective Time.)
- 36. Parental Controls (Enable This Entry → Content Restriction → Whitelist → Blacklist → Add A New Keyword)
- 37. Parental Controls (Whitelist → Blacklist)
- 38. Network Security (Firewall & Dos Protection → Service Filtering → Access Control → Ip & Mac Binding)
- 39. Network Security (Firewall & Dos Protection → Dos Protection Configuration → Traffic Statistics → Protection Level Settings)
- 40. Network Security (Service Filtering)
- 41. Network Security (Access Control)
- 42. Network Security (Select The Access Mode To Either Block (recommended) Or Allow The Device(s) To Access Your Network. → To Block Specific Device(s): → To Allow Specific Device(s):)
- 43. Network Security (Ip & Mac Binding → Blacklist Or Whitelist → Prevent Arp Spoofing And Arp Attacks)
- 44. Network Security (Bind Your Device(s) According To Your Needs → Bind The Connected Device(s) → Bind The Unconnected Device)
- 45. Nat Forwarding (Translate Address And Port By Alg → Share Local Resources Over The Internet By Virtual Server → Open Ports Dynamically By Port Triggering → Make Applications Free From Port Restriction By Dmz → Make Xbox Online Games Run Smoothly By Upnp)
- 46. Nat Forwarding (Translate Address And Port By Alg → Pptp Pass-through → L2tp Pass-through → Ipsec Pass-through → Ftp Alg → Tftp Alg)
- 47. Nat Forwarding (Virtual Server → Assign A Static Ip Address To Your Pc → Visit Http://tplinkwifi.net → Go To Advanced > Nat Forwarding > Virtual Servers)
- 48. Nat Forwarding (Open Ports Dynamically By Port Triggering → Set Up A Dynamic Dns Service Account)
- 49. Nat Forwarding (Port Triggering → Make Applications Free From Port Restriction By Dmz)
- 50. Nat Forwarding (Dmz Configuration → Assign A Static Ip Address → Enable Dmz → Save Settings → Upnp Configuration → Make Xbox Online Games Run Smoothly)
- 51. Nat Forwarding (Upnp Configuration → Tips For Upnp Usage → Connecting Xbox For Online Gaming → Enabling Or Disabling Upnp)
- 52. Vpn Server (Use Openvpn To Access Your Home Network → Use Pptp Vpn To Access Your Home Network)
- 53. Useopenvpntoaccessyourhomenetwork (Setupopenvpnserveronyourcontroller → Enablevpnserver → Configuredynamicdnsservice → Generateacertificate → Selectservicetype → Enteravpnserviceport)
- 54. Vpn Server (Configure Openvpn Connection On Your Remote Device → Use Pptp Vpn To Access Your Home Network → Set Up Pptp Vpn Server On Your Controller)
- 55. Vpn Server (Configure Pptp Vpn Connection On Your Remote Device → Dynamic Dns Service → Client Ip Address → Username And Password → Save)
- 56. Vpn Server
- 57. Vpn Server
- 58. Vpn Server
- 59. Customize Your Network Settings (Change Lan Settings → Configure Ipv6 Lan Settings → Set Up A Dynamic Dns Service Account → Create Static Routes → Set Up The Ipv6 Tunnel → Specify Wireless Settings)
- 60. Customizeyournetworksettings (Changelansettings → Changethelanipaddress → Usethecontrollerasadhcpserver)
- 61. Customizeyournetworksettings (Configuredhcpserver → Enabledhcpfunction → Specifyipaddresspool → Enteraddressleasetime → Reservelanipaddresses)
- 62. Customizeyournetworksettings (Configureipv6lansettings → Configuretheradvdaddresstype → Addressreservation → Macaddress → Specifytheipaddress → Enablethisentry)
- 63. Customizeyournetworksettings (Configurethedhcpv6serveraddresstype)
- 64. Customizeyournetworksettings (Setupadynamicdnsserviceaccount)
- 65. Customizeyournetworksettings (Createstaticroutes)
- 66. Customize Your Network Settings (Make Sure The Routers Use Different Lan Ip Addresses On The Same Subnet. Disable Router Bs Dhcp Function. → Visit Http://tplinkwifi.net, And Log In With The Password You Set For Router A. → Go To Advanced > Network > Static Routing. Select Your Current Wan Interface And Click Save. → Click Add To Add A New Static Routing Entry. Finish The Settings According To The Following Explanations:)
- 67. Customizeyournetworksettings (Networkdestination → Subnetmask → Gateway → Interface → Enablethisentry → Save)
- 68. Customizeyournetworksettings (Setuptheipv6tunnel → Usethepublicipv6tunnelservice-6to4)
- 69. Customizeyournetworksettings (Specifythe6rdtunnelwithparametersprovidedbyyourisp → Enableipv6tunnel → Chooseautoormanual → Clicksave → Visitipv6websiteswiththe6rdtunnel → Setupds-liteandmap-ttunnel)
- 70. Customizeyournetworksettings (Specifywirelesssettings → Changebasicwirelesssettings → Enableordisablewirelessfunction → Changewirelessnetworknameandpassword → Hidessid → Enableordisablebandsteering)
- 71. Customizeyournetworksettings (Mode → Channel → Channelwidth → Tochange The Securityoption)
- 72. Customizeyournetworksettings (Viewwirelessinformation)
- 73. Customizeyournetworksettings (Advancedwirelesssettings → Wirelessstatistics → Beaconinterval → Rtsthreshold → Dtiminterval → Groupkeyupdateperiod)
- 74. Customizeyournetworksettings (Usewpsforwirelessconnection → Wmm → Shortgi → Apisolation → Airtimefairness → Fastroaming(802.11r))
- 75. Customizeyournetworksettings (Enablewps → Enterthecontrollerspinonyourclientdevice → Entertheclientdevicespinonthecontroller → Wpssettings → Note)
- 76. Customizeyournetworksettings (Connectsuccessfullywillappearaftertheconnectbutton,whichmeanstheclientdevicehassuccessfullyconnectedtothecontroller.)
- 77. Set System Time (Test Internet Connectivity → Update The Firmware → Back Up And Restore Configuration Settings → Administration Management → System Log → Cwmp Settings)
- 78. Set System Time (Configure The System Time Using The Following Methods → Manually → Get From Pc → Get From The Internet → Enable Daylight Saving Time)
- 79. Controlled (Testinternetconnectivity)
- 80. Manage Your Controller (Update The Firmware → Back Up Your Controller Configuration Before Upgrading The Firmware → Do Not Turn Off The Controller During The Firmware Upgrade → Download The Latest Firmware File For The Controller → Log In With The Password You Set For The Controller → Go To Advanced > System Tools > Firmware Upgrade)
- 81. Back Up And Restore Configuration Settings (Upgrade Firmware → Reset The Controller To Factory Default Settings → Restore Configuration Settings → Backup Configuration Settings)
- 82. Manageyourcontroller (Rebootthecontroller → Warning → Note)
- 83. Manageyourcontroller (Administrationmanagement → Changetheloginpassword → Localmanagement)
- 84. Enablemanagementoverhttps (Remotemanagement)
- 85. Manage Your Controller (Enable Remote Management And Remote Management Via Https → Set The Client Device Allowed For Remote Management → Save → Icmp Ping)
- 86. Manageyourcontroller (Icmpping → Systemlog → Savelog → Viewsystemlogs → Remoteping → Localping)
- 87. Manage Your Controller (Cwmp Settings)
- 88. Manageyourcontroller (Cwmp → Inform → Informdatamodelwithtr098 → Informinterval → Acsurl → Acsusername/password)
- 89. Manage Your Controller (Snmp Settings → Path → Port → Url → Stun → Stun Server Address/port → Minimum/maximum Keep Alive Period)
- 90. Enablesnmpagent/snmpagentforwan (Read-onlycommunity → Writecommunity → Systemname → Systemdescription → Systemlocation → Systemcontact)
- 91. Manage Your Controller (Enable Traffic Statistics → Traffic Statistics List)
- 92. Default Wireless Password (Resetting Web Management Password → Logging Into The Controller's Web Management Page → Connecting To The Controller → Configuring Ip Address Settings → Checking Computer Settings → Reconfiguring The Controller After Reset)
- 93. Lan Settings (Advanced → Restore Advanced Settings)
- 94. Use Another Web Browser Or Computer To Log In Again. (Reset The Controller To Factory Default Settings And Try Again. → Note: Youll Need To Reconfigure The Controller To Access The Internet Once The Controller Is Reset. → Visit Http://tplinkwifi.net, And Log In With The Password You Set For The Controller. → Go To Advanced > Status To Check Internet Status.)
- 95. Configure The Dns Server (Restart The Modem And The Controller → Reset The Controller To Factory Default Settings And Reconfigure The Controller → Upgrade The Firmware Of The Controller)
- 96. Check The Tcp/ip Settings (Make Sure The Physical Connection Between The Controller And The Modem Is Proper → Clone The Mac Address Of Your Computer → Visit Http://tplinkwifi.net And Log In With The Password You Set For The Controller → Go To Advanced > Network > Internet And Click The Edit Icon To Find The Mac Clone Section → Choose An Option As Needed And Click Ok → Some Isp Will Register The Mac Address Of Your Computer When You Access The Internet For The First Time)
- 97. Modifythelanipaddressofthecontroller (Restartthemodemandthecontroller → Doublechecktheinternetconnectiontype)
- 98. Restart The Modem And The Controller (Upgrade The Firmware Of The Controller → Troubleshooting Wireless Network Connection Issues → Ensure Wireless Function Is Enabled → Check Wireless Adapter Driver Installation → Windows 7 Connection Troubleshooting → Windows Xp Connection Troubleshooting)
- 99. Right Click Wireless Zero Configuration And Then Select Properties (Change Startup Type To Automatic → Check The Wlan Led Indicator On Your Wireless Controller/modem → Make Sure Your Computer/device Is Still In The Range Of Your Controller/modem → Go To Advanced > Wireless > Wireless Settings → Double Check Your Wireless Network Name And Ssid Is Not Hidden → Authenticating Problem/password Mismatch)
- 100. Connecting Using A Security Key Instead (Wireless Password/network Security Key Is Case Sensitive → Check The Wireless Signal Strength Of Your Network → Change The Wireless Channel Of The Controller → Re-install Or Update The Driver For Your Wireless Adapter → Place The Agent Close To The Controller → Reset The Agent And Try To Synchronize The Agent With The Mesh Controller Again)
- 101. Fcc Compliance Information Statement (Product Name: Ax1800 Whole Home Mesh Wi-fi Ap → Model Number: Hx220-g5/hx220 → Responsible Party: Tp-link Usa Corporation → This Equipment Has Been Tested And Found To Comply With The Limits For A Class B Digital Device, Pursuant To Part 15 Of The Fcc Rules.)
- 102. Fcc Rf Radiation Exposure Statement (Mobile Configurations → Antenna Installation Requirements → Separation Distance Requirements → Compliance With Fcc Part 15 → Unauthorized Modifications → Equipment Maintenance And Operation)
- 103. Ukca Declaration Of Conformity (National Restrictions → Canadian Compliance Statement → Caution)
- 104. Radiationexposurestatement (Industrycanadastatement → Koreawarningstatements → Nccnotice → Bsminotice)
- 105. Safety Information (Operating Temperature → Storage Temperature → Explanations Of The Symbols On The Product Label → Caution)
×
TP-Link AX1800 Wireless Router User Manual

















Chapter 2
Connect the Device
This chapter contains the following sections:
ꢀ Position the Device
ꢀ Connect Your Device

| General | Details |
|---|---|
| Name | TP-Link AX1800 Wireless Router User Manual |
| Make | TP-Link |
| Language | English |
| Filetype | PDF (Download) |
| File size | 1.49 MB |
 (1 votes, average: 5.00 out of 5)
 Loading...
If you have any questions regarding TP-Link AX1800 Wireless Router User Manual, please ask here and describe the problem in detail.

TP-Link T150500-2-DT WiFi Router Instruction Manual

TP-Link Archer AX55 Wi-Fi 6 Router Installation Guide

TP-Link VR300 Archer Modem Router User Guide

TP-Link Omada ER8411 VPN Router Instructions

TP-Link Configure VDSL Router User Guide

TP-Link Archer BE805 BE19000 Tri-Band Wi-Fi 7 Router User Manual

TP-Link VR600 Wireless DSL Modem Router Installation Guide

TP-Link AX58 Dual Band Gigabit Wi-Fi 6 Router Installation Guide

TP-Link AC750 Wireless Dual Band Router Owner’s Manual

TP-Link AX6000 8-Stream Wi-Fi 6 Router Installation Guide


TP-Link AXE5400 Tri Band Wi-Fi 6E Gaming Router Installation Guide
evolution DIGITAL SG0006D2VA GPON WiFi6 Mesh Router Installation Guide

ASKEY RT5035W Google Fiber Wi-Fi 6E Router User Guide

AKYPACH A2 Wood Router Tool Compact Trim Router Instruction Manual

ASUS BE6500 Dual Band Wi-Fi 7 Router User Guide

NETGEAR MR6110 5G WiFi 6 Mobile Router User Guide

CONNECTIZE G6 AC2100 Dual Band Gigabit WiFi Router Installation Guide

ASUS RT-AX57 Go AX3000 Dual Band Wi-Fi 6 Router User Guide

amped wireless RTA1750 High Power Wi-Fi Router User Guide

NETGEAR XR300 Nighthawk Gaming Router User Guide
Table of Contents
- 1. Get To Know Your Device - Connect Your Device →
- 2. About This Guide - Position The Device →
- 3. Change The Lan Ip Address - Use The Controller As A Dhcp Ser... →
- 4. User Guide →
- 5. About This Guide - Connect The Device →
- 6. Get To Know Your Device - Product Overview →
- 7. Get To Know Your Device - Product Overview →
- 8. Get To Know Your Device - Led Explanation →
- 9. Connect The Device - Position The Device →
- 10. Connect The Device - Position The Device →
- 11. Connect The Device - Internet →
- 12. Connect The Device - Computer →
- 13. Log In To Your Device →
- 14. Log In To Your Device - Set Up The Tcp/ip Protocol →
- 15. Set Up Internet Connection - Use Quick Setup Wizard →
- 16. Set Up Internet Connection - Use Quick Setup Wizard →
- 17. Set Up Internet Connection - Manually Set Up Your Internet C... →
- 18. Set Up Internet Connection - Static Ip →
- 19. Set Up Internet Connection - Set Up An Ipv6 Internet Connect... →
- 20. Set Up Internet Connection - Set Up The Ipv6 Tunnel →
- 21. Create Mesh Wi-fi System →
- 22. Create Mesh Wi-fi System - To Add An Agent To Your Network →
- 23. Create Mesh Wi-fi System - Tips: →
- 24. Multi-ssid - Warning: Ensure Network Security And Privacy →
- 25. Multi-ssid - Create The Multi-ssid Network →
- 26. Register A Tp-link Id - Change Your Tp-link Id Information →
- 27. Register A Tp-link Id - Change Your Tp-link Id Information →
- 28. Tp-link Cloud Service - Manage The User Tp-link Ids →
- 29. Tp-link Cloud Service - Add Tp-link Id To Manage The Router →
- 30. Manage The Router Via The Tp-link Tether App - Launch The Ap... →
- 31. Easymesh With Seamless Roaming →
- 32. Easymesh With Seamless Roaming - Same Network Name & Passwor... →
- 33. Easymesh With Seamless Roaming - Add Mesh Device →
- 34. Parental Controls →
- 35. Parental Controls - Visit Http://tplinkwifi.net, And Log In ... →
- 36. Parental Controls - Enable This Entry →
- 37. Parental Controls - Whitelist →
- 38. Network Security - Firewall & Dos Protection →
- 39. Network Security - Firewall & Dos Protection →
- 40. Network Security - Service Filtering →
- 41. Network Security - Access Control →
- 42. Network Security - Select The Access Mode To Either Block (r... →
- 43. Network Security - Ip & Mac Binding →
- 44. Network Security - Bind Your Device(s) According To Your Nee... →
- 45. Nat Forwarding - Translate Address And Port By Alg →
- 46. Nat Forwarding - Translate Address And Port By Alg →
- 47. Nat Forwarding - Virtual Server →
- 48. Nat Forwarding - Open Ports Dynamically By Port Triggering →
- 49. Nat Forwarding - Port Triggering →
- 50. Nat Forwarding - Dmz Configuration →
- 51. Nat Forwarding - Upnp Configuration →
- 52. Vpn Server - Use Openvpn To Access Your Home Network →
- 53. Useopenvpntoaccessyourhomenetwork - Setupopenvpnserveronyour... →
- 54. Vpn Server - Configure Openvpn Connection On Your Remote Dev... →
- 55. Vpn Server - Configure Pptp Vpn Connection On Your Remote De... →
- 56. Vpn Server →
- 57. Vpn Server →
- 58. Vpn Server →
- 59. Customize Your Network Settings - Change Lan Settings →
- 60. Customizeyournetwork... - Changelansettings →
- 61. Customizeyournetwork... - Configuredhcpserver →
- 62. Customizeyournetwork... - Configureipv6lansett... →
- 63. Customizeyournetworksettings - Configurethedhcpv6serveraddre... →
- 64. Customizeyournetworksettings - Setupadynamicdnsserviceaccoun... →
- 65. Customizeyournetwork... - Createstaticroutes →
- 66. Customize Your Network Settings - Make Sure The Routers Use ... →
- 67. Customizeyournetwork... - Networkdestination →
- 68. Customizeyournetwork... - Setuptheipv6tunnel →
- 69. Customizeyournetworksettings - Specifythe6rdtunnelwithparame... →
- 70. Customizeyournetwork... - Specifywirelesssetti... →
- 71. Customizeyournetwork... - Mode →
- 72. Customizeyournetwork... - Viewwirelessinformat... →
- 73. Customizeyournetwork... - Advancedwirelesssett... →
- 74. Customizeyournetwork... - Usewpsforwirelesscon... →
- 75. Customizeyournetwork... - Enablewps →
- 76. Customizeyournetworksettings - Connectsuccessfullywillappear... →
- 77. Set System Time - Test Internet Connectivity →
- 78. Set System Time - Configure The System Time Using The Follow... →
- 79. Controlled - Testinternetconnecti... →
- 80. Manage Your Controller - Update The Firmware →
- 81. Back Up And Restore Configuration Settings - Upgrade Firmwar... →
- 82. Manageyourcontroller - Rebootthecontroller →
- 83. Manageyourcontroller - Administrationmanage... →
- 84. Enablemanagementover... - Remotemanagement →
- 85. Manage Your Controller - Enable Remote Management And Remote... →
- 86. Manageyourcontroller - Icmpping →
- 87. Manage Your Controller - Cwmp Settings →
- 88. Manageyourcontroller - Cwmp →
- 89. Manage Your Controller - Snmp Settings →
- 90. Enablesnmpagent/snmp... - Read-onlycommunity →
- 91. Manage Your Controller - Enable Traffic Statistics →
- 92. Default Wireless Password - Resetting Web Management Passwor... →
- 93. Lan Settings - Advanced →
- 94. Use Another Web Browser Or Computer To Log In Again. - Reset... →
- 95. Configure The Dns Server - Restart The Modem And The Control... →
- 96. Check The Tcp/ip Settings - Make Sure The Physical Connectio... →
- 97. Modifythelanipaddressofthecontroller - Restartthemodemandthe... →
- 98. Restart The Modem And The Controller - Upgrade The Firmware ... →
- 99. Right Click Wireless Zero Configuration And Then Select Prop... →
- 100. Connecting Using A Security Key Instead - Wireless Password/... →
- 101. Fcc Compliance Information Statement - Product Name: Ax1800 ... →
- 102. Fcc Rf Radiation Exposure Statement - Mobile Configurations →
- 103. Ukca Declaration Of Conformity - National Restrictions →
- 104. Radiationexposuresta... - Industrycanadastatem... →
- 105. Safety Information - Operating Temperature →