×
- 1. S9500-30xs (Disaggregated Cell Site → Gateway Router → Hardware Installation Guide)
- 2. Overview (Installation Tools → Installation Environment Requirements → Preparation Check List → Package Contents → Installing Power Supply Units → Initial System Setup)
- 3. Connecting A Cable To The Bits Interface (Connecting The Gnss Interface → Connecting The 1pps Interface → Connecting The 10mhz Interface → Connecting The Transceiver → Installing An Antenna → Cautions And Regulatory Compliance Statements)
- 4. Overview (Hardware Installation Process → Installation Requirements → Configuration Steps → Safety Precautions → Troubleshooting → Technical Support)
- 5. Preparation (Installation Tools → Initial System Setup → Baud Rate: 115200 Bps → Data Bits: 8 → Parity: None → Stop Bits: 1)
- 6. Installation Environment Requirements (Power Reserve → Space Clearance)
- 7. Preparation Check List (Power Voltage And Electric Current Requirement → Installation Spacing Requirement → Thermal Requirement → Installation Tools Required → Accessories Required)
- 8. Package Contents (Accessory List → Item → Description → Spec. & Dimensions → Qty. → Weight)
- 9. Component Physical Information (Specification → Total Package Contents → Power Supply Unit (psu) → Weight → Dimension Psu (w X D X H) → Fan (w X D X H))
- 10. Identifying Your System (S9500-30xs Overview → S9500-30xs Hardware Installation Guide)
- 11. Dcversionpsuoverview (Acversionpsuoverview → Powersupplyunit(psu)with1+1redundancy → Hotswappable → Fieldreplaceableunit(fru))
- 12. Fan Overview (Port Overview → Port Id → Form Factor → Maximum Support Distance → Support Speed)
- 13. Rack Mounting (Secure The Rack Mount Brackets Onto The Router → Secure The Router Onto The Rack Posts)
- 14. Installing Fan Modules
- 15. Installing Power Supply Units (Dc Version: → Ac Version: → Shock Hazard!)
- 16. Align The New Psu With The Power Bay (Carefully Slide The New Psu Into The Power Bay → Audible Click When The Psu Is Installed Correctly)
- 17. Grounding The Router (This Equipment Must Be Grounded → Before Grounding The Router → Strip The Insulation From A Size #6 Awg Grounding Wire → Insert The Exposed Grounding Wire → Using A Crimping Tool, Firmly Secure The Grounding Wire)
- 18. Locate The Designated Location For Securing The Grounding Lug (Using 2 M4 Screws And 4 Washers To Lock The Grounding Lug)
- 19. Connecting Power (Dc Version → Attach The Power Cable → Tighten The Screws To The Specified Torque)
- 20. Feed Dc Power Into The System. (Verify That The Power Supply Is Operating. → Ensure There Is Enough Power To Supply The System. → Attach The Power Cable. → Verify That The Power Supply Is Operating.)
- 21. Verifying (System Operation → Front Panel Led → Led Condition → Gnss → Sync → Stat)
- 22. Led Condition (Fan → Pwr → Psu Fru Led → Fan Fru Led → Management Port Led → Warning Working Condition Not Satisfied. Please Check The Voltage, Electric Current, And Temperature.)
- 23. Initial System Setup (Establishing A First-time Serial Connection → Accessing The Cli → Connecting The Console Cable → Connecting Using The Rj45 Port → Connecting Using The Micro Usb Port → Installing Drivers For Micro Usb Connection)
- 24. Checkforserialcontrolavailability (Launchaterminalemulator → Logintothedevice)
- 25. Connecting A Cable To The Bits Interface (Connecting The Gnss Interface)
- 26. Connecting The 1pps Interface (Connecting The 10mhz Interface)
- 27. Connecting The Transceiver (Installing An Antenna)
- 28. Installation Guidelines For Active Antenna (Antenna Performance Optimization → Gnss Receiver Signal Strength Requirements → Gnss Antenna Power Supply Specifications → Surge Protection For Gnss Antenna)
- 29. Cautions And Regulatory Compliance Statements (Safety Notices → Electrical Hazard → Warning: Network Switch Power Supplies Do Not Have Switches For Turning The Unit On And Off → Caution: Before Mounting The Device, Ensure That The Rack Can Support It Without Compromising Stability → Caution: Use Of Controls Or Adjustments Or Performance Of Procedures Other Than Those Specified Herein May Result In Hazardous Radiation Exposure → Warning: The Equipment Should Only Be Used Within A Restricted Access Area)
- 30. Caution: Dc Power Supply Requirements (Caution: Intra-building Ports Connection Guidelines → Caution: Shielded Intra-building Cabling Requirements → Installation In Outside Plant (osp) Facilities → System Boot Time Under Different Temperature Environments → Warranty Label Information → Class A Ite Notice And Vcci Notice)
- 31. S950030xs Hardware Installation Guide
- 32.
×
UfiSpace S9500-30XS Gateway Router Installation Guide
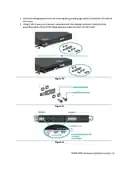
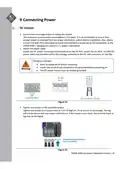
5. Locate the designated location for securing the grounding lug, which is located on the side of
the router.
6. Using 2 M4 screws and 4 washers (provided with the package contents), firmly lock the
grounding lug to either of the designated grounding locations on the router.
Figure 20.
Figure 21.
Figure 22.
S9500‐30XS Hardware Installation Guide | 15
| General | Details |
|---|---|
| Name | UfiSpace S9500-30XS Gateway Router Installation Guide |
| Make | UfiSpace |
| Language | English |
| Filetype | PDF (Download) |
| File size | 0.75 MB |


(1 votes, average: 5.00 out of 5)If you have any questions regarding UfiSpace S9500-30XS Gateway Router Installation Guide, please ask here and describe the problem in detail.

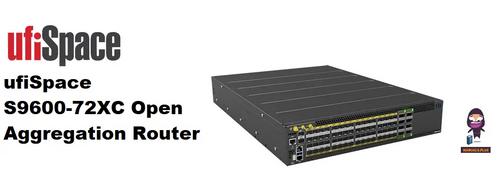
ufiSpace S9600-72XC Router Installation Guide

UfiSpace S9600-64X 100G Aggregation Router Installation Guide

UfiSpace S9600-32X 100G Aggregation Router Installation Guide

UfiSpace S9501-28SMT Gateway Router Installation Guide


MERCUSYS EU2_16 Wireless Router Installation Guide

Tenda RX2 Pro Dual Band WiFi 6 Router Installation Guide

CEDARouter C3 5G Aggregation Router User Guide

Ibex-RT-630-5G Series EN 50155 5G and WLAN Router User Manual

Starlink Mesh Nodes wifi router User Guide

Pix-Link AX02 Wi-Fi 6 Router Installation Guide

Netcomm NF18MESH Upgraded WiFi Router User Guide

HAUS AWM55 Portable 5G Router User Guide

SMAWAVE SRP620-B 5G IP67 Ruggedized Router User Guide

U Speed T262-T21D AX1500 Dual Band Wi-Fi 6 Router Installation Guide
Table of Contents
- 1. S9500-30xs - Disaggregated Cell Site →
- 2. Overview - Installation Tools →
- 3. Connecting A Cable To The Bits Interface - Connecting The Gn... →
- 4. Overview - Hardware Installation Process →
- 5. Preparation - Installation Tools →
- 6. Installation Environment Requirements - Power Reserve →
- 7. Preparation Check List - Power Voltage And Electric Current ... →
- 8. Package Contents - Accessory List →
- 9. Component Physical Information - Specification →
- 10. Identifying Your System - S9500-30xs Overview →
- 11. Dcversionpsuoverview - Acversionpsuoverview →
- 12. Fan Overview - Port Overview →
- 13. Rack Mounting - Secure The Rack Mount Brackets Onto The Rout... →
- 14. Installing Fan Modules →
- 15. Installing Power Supply Units - Dc Version: →
- 16. Align The New Psu With The Power Bay - Carefully Slide The N... →
- 17. Grounding The Router - This Equipment Must Be Grounded →
- 18. Locate The Designated Location For Securing The Grounding Lu... →
- 19. Connecting Power - Dc Version →
- 20. Feed Dc Power Into The System. - Verify That The Power Suppl... →
- 21. Verifying - System Operation →
- 22. Led Condition - Fan →
- 23. Initial System Setup - Establishing A First-time Serial Conn... →
- 24. Checkforserialcontro... - Launchaterminalemula... →
- 25. Connecting A Cable To The Bits Interface - Connecting The Gn... →
- 26. Connecting The 1pps Interface - Connecting The 10mhz Interfa... →
- 27. Connecting The Transceiver - Installing An Antenna →
- 28. Installation Guidelines For Active Antenna - Antenna Perform... →
- 29. Cautions And Regulatory Compliance Statements - Safety Notic... →
- 30. Caution: Dc Power Supply Requirements - Caution: Intra-build... →
- 31. S950030xs Hardware Installation Guide →
- 32. Page 32 →


