CalAmp LMU-5541 Telematics Router Installation Guide


9/28/23, 4:30 PM
LMU-5541 Hardware & Installation Guide - PULS Wiki
Be sure to consider the design decisions described in the previous sections. When you are ready to begin installing the LMU, follow these steps:
6.3.1 Place the LMU in the Vehicle
Typically, the LMU should be placed under the passenger seat or dashboard of the vehicle. LMUs with internal antennas should be placed to maximize their GPS
performance. A typical location include under the dash close to the front wind-shield.
Attach the LMU to the solid body of the vehicle, not to plastic panels. The LMU can be placed out of sight by removing interior trim and molding to expose available
space, then replacing the trim once the LMU is in place.
6.3.2 Connect Power, Ignition, and Ground
The power input (red wire) must be connected to a constant (un-switched) +12 VDC or +24 VDC supply; preferably, connected directly to the vehicle battery terminal or
as close to it as possible. This connection point should be fuse protected to not more than 5 Amps.
The ignition input (white wire) must be connected to the vehicle ignition or another appropriate key operated line, such as ACCESSORY, ensuring that power to the
ignition wire is available only when the vehicle ignition is on.
The ground line (black wire) must be connected to chassis ground.
Failure to connect these lines in the manner described may result in discharge of the vehicle battery.
For best results, it is strongly recommended that the LMU connection be on its own circuit. Connect the power input directly to the vehicle battery if possible and protect
the circuit with an inline fuse. If you must connect through the fuse box, use standard commercial wiring practices to create a permanent installation rather than using
press-in fuse clips or other temporary measures.
DO NOT connect the power cable to the LMU at this time.
6.3.3 Place the GPS Antenna
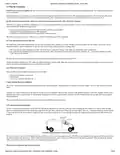
The GPS antenna must have a clear view of the sky. Mount the GPS antenna on the vehicle’s highest point (for example, the roof of a car). Make sure that there are no
obstructions close to the antenna that might block the view 360° to the horizon. Air horns lights, vents, etc.. should not block the antenna beyond 5° above the horizon.
Kinks or knots in the antenna cable can prevent the GPS receiver from operating properly. When laying out the antenna cable, take care that the cable is not subjected to
crushing or strain.
The ideal location is typically near the center of the vehicle’s roof. However, it is also desirable to locate the cellular antenna as far from the GPS antenna as possible.
Examples of good and poor GPS antenna placements
6.3.4 Mount the Comm. Antenna
When using separate Comm and GPS antennas, it is best to locate the Comm. Antenna at least 3 feet from the GPS antenna. Ensure that the cable is not crushed during
installation or normal vehicle operation.
Again, the Comm. Antenna must be located at least 20cm away from vehicle passengers, other personnel, or bystanders in order to comply with FCC radio frequency
exposure limits.
Window Mount Antenna Location
6.3.5 Typical Connection Sequence
Attach the cable from the GPS antenna.
Connect the cable from the Comm.. antenna
17/29

| General | Details |
|---|---|
| Name | CalAmp LMU-5541 Telematics Router Installation Guide |
| Make | CalAmp |
| Language | English |
| Filetype | PDF (Download) |
| File size | 0.5 MB |

If you have any questions regarding CalAmp LMU-5541 Telematics Router Installation Guide, please ask here and describe the problem in detail.


Ronix 7112 Electric Router User Guide

NRadio Technologies N300 4G Pocket Size LTE Modem Router User Manual
verizon CR100A Wireless Router User Guide

Tenda RX12L WiFi 6 Router Installation Guide

LINOVISION IOT-R32W Cellular Router User Manual

Dbit T1 Pro N300 Wireless Wi-Fi Router User Manual

UTR-232 WiFi 6 Starlink Router Instruction Manual

Tenda RX2LP Dual Band Gigabit Wi-Fi 6 Router Installation Guide

Xiaomi AX9000 Router User Manual

NIGHTHAWK Router User Manual