CalAmp LMU-5541 Telematics Router Installation Guide


9/28/23, 4:30 PM
Connect any peripherals to the LMU
LMU-5541 Hardware & Installation Guide - PULS Wiki
Plug in the power harness.
The physical installation of the LMU hardware is now complete.
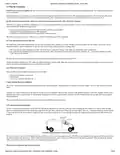
Completed Install – separate antennas
Completed Install - Internal antennas
6.4 Installation Verification
In many cases it is desirable to verify that an installed LMU-5541™ is working properly. That is, installers should verify that the GPS and communications functions of
the LMU-5541™ are working properly before departing the installation site. In more robust cases, some key configuration settings such as the Inbound Address and URL
should also be verified.
Note that these processes are all based on issuing AT Commands to the LMU-5541™. It is expected that installers will have access to a serial port expansion cable and a
laptop or PDA capable of a terminal connection. Alternatively, an SMS message can be sent to an LMU-5541™ to obtain its current status.
6.4.1 Comm Verification
Installers should first verify that the LMU-5541™ has been acquired and has registered to the wireless network. This may be verified in one of two ways. First, installers
may look at the Comm LED (i.e., the one closest to the SMC antenna connector). If this LED is solid, then the LMU has registered to the network and established a data
session.
If the LED is not visible, then Comm may be verified using an AT Command:
ATIC
Depending on the wireless network being used something similar to what is shown below will be displayed. It is important to verify that 'Yes' values are displayed at the
top for Data and Network registration and the correct APN is displayed.
If any of the responses return Not-Acquired or Not-Registered (and the APN is correct), the wireless network operator should be contacted for further troubleshooting.
Please note that it may take several seconds (or longer) for the LMU-5541™ to communicate with the modem and acquire the wireless network.
6.4.2 GPS Verification
The next step is to verify that the GPS receiver is seeing enough satellites to obtain a valid GPS position. Again, installers have two choices on how to perform this
verification. First, like the Comm Verification, there is a GPS status LED (i.e., the one closest to the SMA connector). If this LED is solid, then the LMU has found GPS
service.
If the LED is not visible then GPS service may be verified using an AT Command:
AT$APP GPS?
The response should be similar to:
18/29

| General | Details |
|---|---|
| Name | CalAmp LMU-5541 Telematics Router Installation Guide |
| Make | CalAmp |
| Language | English |
| Filetype | PDF (Download) |
| File size | 0.5 MB |

If you have any questions regarding CalAmp LMU-5541 Telematics Router Installation Guide, please ask here and describe the problem in detail.


ASUS GT-BE19000 WiFi 7 Tri Band Gaming Router User Guide

DrayTek Vigor2927 Dual WAN Security Router User Guide

JUniPer MX304 Universal Router User Guide

Cudy LT500 Outdoor Router Installation Guide

ASUS ZenWiFi XD5 AX3000 Dual Band WIFi Router User Guide

ZTE E1320 WiFi 6 Wireless Router User Manual

Spectrum 20240729 WiFi 6E Router User Guide

ioGiant AX1800 Wi-Fi Router Wireless Router Installation Guide

D-Link BE7200 Wi-Fi 7 Router User Manual

TAIKO AUDIO TAP0016 Extreme Router User Guide