Datto DSE641T 2×2 WiFi 6 Router User Guide


Availability
Schedule WiFi A WiFi schedule allows you to enable or disable each SSID for specific
times of the day. The SSID will be enabled or disabled upon checkin to Datto Network
Manager, typically within five minutes of the times specified. This schedule will
control the SSID only if Enabled for the SSID.
Advanced Settings
Band Steering Attempts to connect clients to the 5Ghz band when possible in order to
best utilize available bandwidth. Band Steering is only available when "Band" is set to
"Both - Combined SSID”.
802.11r Fast BSS transition (FT), attempts to reduce handoff delay in situations where
an end device is roaming from one AP to another. This is useful in applications such as
VoIP calls that must maintain continuity of connection. This option is only available if
the SSID has WPA authentication enabled.
Block LAN Access: Prevents users on this wireless network from accessing your wired
LAN.
Client isolation: Prevents your wireless users from being able to access each other's
computers and common for public networks. Unchecking this box will allow you to do
things like share a printer attached to the network, but will also allow malicious users
access to other users on the network. Uncheck this ONLY if you know all users have a
firewall enabled on their computers.
DNS Intercept this must be enabled for Alternate DNS, Blocked Devices, Blocked
Message and Splash Page functionality to work
SMTP Redirect: Alternate SMTP server IP address for your network. This allows users
to send SMTP email by using your ISP's SMTP server.
Alternate DNS: Alternate DNS server IP addresses, one per line, for this SSID. This
setting will override your network-wide Alternate DNS settings on this SSID. This allows
you to use services such as OpenDNS for content filtering, client tracking and more.
Access Control List: MAC addresses allowed to use this Access Point, one per line.
All other users (MAC addresses) will not be able to browse on this access point.
Leave blank to allow all MAC addresses (recommended).
Bridge to LAN: Each SSID can be bridged to the LAN for access to local LAN resources.
Bridge to VLAN: Each SSID can be tagged with a number from 2-4094 so you can
control traffic flow within your LAN. Using a VLAN automatically bridges the SSID to
the LAN.
23
PayPal Item ID: You can require guests to pay for all service or enhanced service
through PayPal.
See the guides at the end of this document.
Configure > Radio
The Radio settings controls network-wide access point settings. The main items you'll
want to set are Channels and Internet Check.
Channels: Auto Channel will let Network Manager optimize channel settings daily for
your network, taking into consideration mesh repeaters, nearby access points, and
sources of interference. Auto Channel respects the Maintenance Window setting in
Configure > Maintenance to avoid disruptions during critical times. If Auto is selected
then the ability to specify channels, on either a per-network or per-access point basis,
is disabled.
Manual lets you specify a single channel per band to use for all access points. You can
override individual access points in Manage > Access Points.
Internet Check: When selected, the wireless network will only be available when
there is an active Internet connection. This allows access points to recover quickly
when they lose a connection and is the recommended setting. When deselected, the
wireless network will stay up even when there is no Internet connection. This allows
local resources such as printers and shared drives to continue to function, but access
points may take longer to recover when they lose a connection.
Configure > Maintenance
Automatic Upgrades: When enabled, your network will automatically upgrade to the
latest firmware version as new stable upgrades become available.
Maintenance window: Select the period of time each day when Network Manager can
perform maintenance on your network. This maintenance includes firmware upgrades
and Auto Channel scanning and configuration.
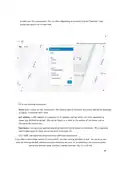
Configure > Display
The Display section allows you to customize the look and feel of Network Manager, and
enable external embeds.
Display Name: Used to display a more descriptive name on reports. When none is
entered, the network name will be used.
Update Logo: Load your own logo to replace the Network Manager logo in the top left
corner of the application.
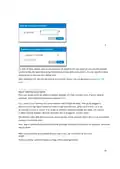
Allow Read-Only: Click to enable the password-free read-only view of the network
status. When enabled, read-only view can be accessed by entering just the network
name in Network Manager without a password. The password will still be required to
change any network settings.
24
Enable 12 Hour Display: Check to display time in 12 hour (am/pm) format.
External embeds: Use the HTML snippet to embed Network Manager reporting pages
on an external site like a client portal.
Configure > Advanced
The Advanced Settings page has a variety of settings that most users won't change.
This section will touch on the more common settings.
AP Mesh When disabled, this turns off meshing on your APs. Mesh Encryption must be
enabled.
Mesh Encryption: Encrypts all mesh traffic with WPA2 protection. Access points not
belonging to this network won't be able to join the mesh due to the encryption.
Alternate DNS: Alternate DNS server IP address for your network, such as OpenDNS.
OpenDNS provides several additional features such as content filtering that you may
find helpful. This setting applies to all SSIDs and can be overridden by setting an
Alternate DNS for each individual SSID.
Presence Reporting Settings to configure exporting presence data about wireless clients.
Commonly used for location analytics. Note that this feature will be part of a paid
package of services in the future. Learn more
Status LED(s) When disabled, this turns off LED lights on your APs
Share Vouchers: When enabled, vouchers created on this network will be usable on all
other networks under this account.
Bridge wired clients: When a wired client is connected to an access point, it will use
settings from this SSID.
Application Reporting (DPI) Disabling this will cause application data (pie chart and
table) in the clients page to not be displayed and application data in the networks
overview page to display all traffic as ‘unclassified’.
IGMP Proxy When enabled multicast traffic will be allowed over the LAN. When
disabled multicast traffic will be blocked from entering the LAN Roaming VLANs
Provides seamless roaming to all SSIDs that aren't bridged to the LAN. Requires
that your Switch already be configured to utilize our VLANs. To learn more about
setting this feature up, click here. Not compatible with Client Isolation.
Bridge SSID: Select an SSID to bridge to the LAN. This gives clients access to LAN
resources such as file servers and printers, disables NAT and lets your LAN assign all
client DHCP addresses. You can bridge additional SSIDs by using a VLAN tag on each
SSID settings page.
Delete Network: Select to delete this network from Network Manager.
25

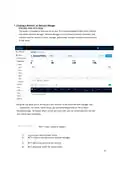
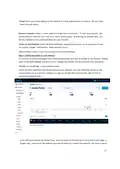
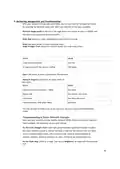
9. Monitoring, Management, and Troubleshooting
With your network running and customized, you can now monitor its usage and status
by selecting the Network Status link. Here’s an overview of the tools available:
Network Usage graph at the top of the page shows the number of users on SSID#1 and
the amount of upload and download traffic.
Node Map shows the nodes relationship to each other on a map.
Node List gives details on each individual node.
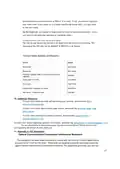
Node Outages Chart shows the check-in status of a node using colors.
STATE
COLOR
Cloud check-in succeeded
IP acquired via DHCP, but inet test is failing
Solid Teal
Flash Purple
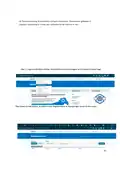
Users List shows all users connected to the network.
Network Diagram shows how all nodes relate to
each other.
STATE
COLOR
Checkin performed, mesh speed <= 2Mbps
Orphan mode
Flash Green
Flash (Yellow), then Green
Flash (Red), then Green
Solid Green
Lonely mode
checkin performed, mesh speed >2Mbps
You can use each of these tools to see how your network is doing and troubleshoot
issues.
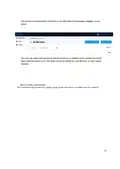
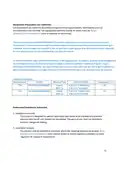
Troubleshooting in Datto Network Manager
Have you have created a strong, healthy network? While there are plenty of diagnostic
tools available, the following two are most telling:
On the Node Outages Chart: dark/light green indicate a gateway/repeater is online
and hasn't missed a check-in, yellow indicates a node has lost contact with the mesh
and is in lonely/orphan mode, pink is when a node needs re-pairing (update of
network settings), and gray indicates it's down, offline or has missed check-ins.
On the Node Map: (click on a node, then select Neighbors) all nodes will have at least
one
26
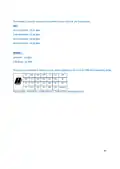
| General | Details |
|---|---|
| Name | Datto DSE641T 2×2 WiFi 6 Router User Guide |
| Make | datto |
| Language | English |
| Filetype | PDF (Download) |
| File size | 0.7 MB |

If you have any questions regarding Datto DSE641T 2×2 WiFi 6 Router User Guide, please ask here and describe the problem in detail.


AMTEL AMT5500 Router User Manual

mafell LO 55 Hand Router Instruction Manual

D-Link BE7200 Wi-Fi 7 Router User Manual

HUAWEI WS7100 V2 WiFi 6 Plus WiFi Router User Guide

mikrotik LHG 60G Series Wireless Router User Guide

neptronic RPB11 RPB BACnet Router Instruction Manual

HUAWEI 5G CPE Pro 2 WiFi 6 Router User Guide

D-Link M30 Wi-Fi 6 Mesh Router User Guide

TRUPER ROU-A3 Professional Router User Manual

WolfPack HDTVHDMX0808 4K 8×8 HDMI Matrix Router User Manual