Home > DIGITAL YACHT > Digital Yacht NeXuX Connect WiFi Router Installation Guide
Digital Yacht NeXuX Connect WiFi Router Installation Guide


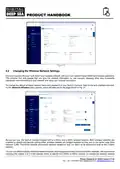


settings, click on the “Edit” icon (Pencil) in either the 2.4GHz or 5GHz network’s row. Now you will be taken to the screen
shown in Fig 14, where you can enter the SSID (Wireless Network Name) that you wish to use.
Figure 14
When choosing network names, it is best to avoid spaces and special characters (such as apostrophes) in the SSID or
password. Instead of using a space, use the underscore character, i.e. for “My Network” use “My_Network”. Once you have
changed your network’s SSID, now change the Password (must be more than 8 characters).
Try to use a strong password with at least one capital letter and a mix of numbers and letters. As with the SSID, it is best to
avoid special characters and spaces. Make sure to record your password somewhere secure but easy for you to access,
as resetting a wireless password requires a wired connection to the NeXuX Connect or a factory reset, both of which are
not always easy or practical.
Once the Network Name and Password have been entered, click the “Save & Apply” button and the NeXuX Connect will
apply the new settings and reboot. Due to the network name change, your wireless device will be dis-connected, so wait
for the new wireless network name to appear in your Wi-Fi scan list (50-60 secs) and connect to it using the new password.
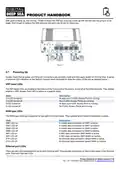
4.3
Changing the Internet (WAN) Connection
The NeXuX Connect can connect to the internet in the following ways:
1) Using the mobile network of the inserted SIM card(s)
2) Via another internet connection device, for example Starlink, connected to its wired WAN socket
3) By using one of its two wireless adaptors to connect to a wireless hotspot
By default the NeXuX Connect is designed to use the mobile network of the SIM in slot “SIM1” which in the web interface
is referred to as MOB1S1A1. It also has a SIM2 slot (MOB1S2A1) which can have a second SIM card, from another
mobile network operator, inserted. You will need to setup the Auto or Manual APN settings for each of SIM card, see
section 4.1 for details, making sure to enter the correct APN settings for the right SIM card.
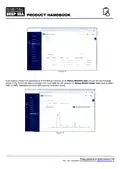
If you are using two SIMs, you will need to select the SIM card, whose mobile network you would like to use. This is done
by going to NETWORK>MOBILE>GENERAL and you will see the settings for SIM1 appear (see Fig 15). The “Default
SIM” switch will be ON and if you wish to switch to use SIM2, click on the SIM2 tab and turn ON the “Default SIM” switch.
Now click the SAVE & APPLY button and the modem will restart using the SIM2 network. Whichever SIM you set as the
default, the “Default SIM” switch of the other SIM will switch OFF automatically – you do not have to turn it OFF.
Product Handbook for NeXuX Connect V1.00
| General | Details |
|---|---|
| Name | Digital Yacht NeXuX Connect WiFi Router Installation Guide |
| Make | DIGITAL YACHT |
| Language | English |
| Filetype | PDF (Download) |
| File size | 0.3 MB |

If you have any questions regarding Digital Yacht NeXuX Connect WiFi Router Installation Guide, please ask here and describe the problem in detail.

DIGITAL YACHT 4GXtream NMEA 2000 3G or 4G Router Instruction Manual

DIGITAL YACHT 4GXtream NMEA 0183 3G or 4G Router Instruction Manual

DIGITAL YACHT Littoral Link 4G Router Instruction Manual

Cudy WR3000 AX3000 Wi-Fi 6 Mesh Router User Guide

D-Link DSL-X1852E Modem Router Instructions

ALTIUS Machine 4G Wireless Router User Manual

D-Link DWR-933M Router Owner’s Manual

GUBIA CPE 4G LTE Wireless Router User Manual

MikroTik RBcAPGi-5acD2nD-XL Wireless Router User Guide

ASUS RTAX6P00 ZenWiFi Hybrid MoCA Mesh Router User Manual

TP-Link TD-W9970 300 Mbps Wireless DSL and ADSL Modem Wi-Fi Router Owner’s Manual

dahua AX1500 Wi-Fi6 Wireless Router Instruction Manual

Touch Controls ER-B-10-100-120 Ethernet Router Instruction Manual