Home > DIGITAL YACHT > Digital Yacht NeXuX Connect WiFi Router Installation Guide
Digital Yacht NeXuX Connect WiFi Router Installation Guide


1. Introduction
Congratulations on the purchase of your NeXuX Connect 4G Router. This unit is designed for permanent installation on
board a sail or motor boat. The NeXuX Connect comprises of the following parts;
•
•
•
•
•
•
NeXuX Connect Router/Modem unit
2x internal Wi-Fi antennas
1x External dual 4G LTE antenna and 7m Cables
1x GPS Antenna
1x Power Cable
User Manual
Before operating NeXuX Connect you should familiarise yourself with this User Manual and the manuals
for any other equipment you wish to connect to it.
2. Before you start
The NeXuX Connect is configured and controlled via its built-in web interface. In order to access this, you will need a
wireless device such as a PC/Mac, Tablet or Smart Phone running a modern web browser such as Chrome, Safari, Edge
or Firefox. No special drivers or software are required to make the NeXuX Connect work.
Do not plug in the NeXuX Connect to the Ethernet port of your computer whilst the NeXuX Connect is
powered up and always ensure that the NeXuX Connect antennas are connected before powering up the
NeXuX Connect.
3. Installation
The NeXuX Connect is designed to be mounted below deck. When deciding on the best location, a central location will give
best Wi-Fi reception in all areas of the boat. You should also consider the 7m coax cable length of the external 4G Combo
Antenna, which should not be extended. It is better to locate the NeXuX Connect unit within the 7m limit of the supplied 4G
antenna cables, and then use a wireless repeater if Wi-Fi reception is poor in some areas of the vessel.
The power cable can be easily extended, as can the LAN/WAN Ethernet cables.
The default settings of the NeXuX Connect have been chosen for optimum performance and we do not
recommend users make any changes to them, except to change the default wireless network name (SSID)
and wireless password.
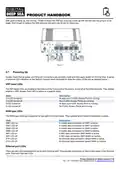
3.1
Mounting the NeXuX Connect
The NeXuX Connect should be mounted in position using M4 screws or other fixings appropriate to the mounting location.
It can be mounted in any orientation, as the Wi-Fi antennas can be rotated and bent for best reception, although we
recommend mounting the NeXuX Connect vertically with the antennas pointing upwards, to avoid stress on the cables
and to ensure any moisture/condensation falls away from the connectors.
On the next page (Fig.1) is a dimensioned drawing of the NeXuX Connect. When rotating the supplied Wi-Fi antennas,
always rotate them clockwise to avoid loosening them. Make sure you allow suitable space around the top and bottom of
the unit, to comfortably route the cables (avoiding tight bends) and to secure them so that the weight of the cables is not
just being taken by the cable connectors.
Product Handbook for NeXuX Connect V1.00
| General | Details |
|---|---|
| Name | Digital Yacht NeXuX Connect WiFi Router Installation Guide |
| Make | DIGITAL YACHT |
| Language | English |
| Filetype | PDF (Download) |
| File size | 0.3 MB |

If you have any questions regarding Digital Yacht NeXuX Connect WiFi Router Installation Guide, please ask here and describe the problem in detail.

DIGITAL YACHT 4GXtream NMEA 2000 3G or 4G Router Instruction Manual

DIGITAL YACHT 4GXtream NMEA 0183 3G or 4G Router Instruction Manual

DIGITAL YACHT Littoral Link 4G Router Instruction Manual


STRONG 4G LTE Wi-Fi Router Installation Guide

KMC Controls BAC-5051 TRUEFIT Measurement System Router User Guide

TP-Link Archer AX53 Dual Band Wi-Fi 6 Router Installation Guide

JUNIPER SSR1400 Session Smart Router User Guide

GOST VG5-CG Multi Carrier Select Router User Guide

Taiko TAP0016 Audio Extreme Router User Manual

TP-Link ER706W Wi-Fi Gigabit VPN Router User Guide

ASUS XD5 AX3000 Dual Band WiFi Router User Guide

D-Link DWR-960 Wi-Fi Router Instruction Manual

Cudy WR2100 Gigabit Dualband WLAN Mesh Router Installation Guide