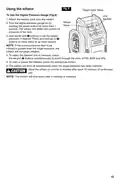
SKIL RT1323-00 10 Amp Fixed Base Corded Router Owner’s Manual


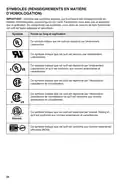


SYMBOLS (CONTINUED)
IMPORTANT: Some of the following symbols may be used on your tool. Please study them
and learn their meaning. Proper interpretation of these symbols will allow you to operate the
tool better and more safely.
Symbol
Name
Designation/Explanation
Voltage (potential)
Current
V
A
Volts
Amperes
Hertz
Hz
W
kg
min
s
Frequency (cycles per second)
Power
Watt
Kilograms
Minutes
Weight
Time
Seconds
Watt-hours
Ampere-Hours
Diameter
No load speed
Rated speed
Time
Wh
Ah
Ø
Battery capacity
Battery capacity
Size of drill bits, grinding wheels, etc.
Rotational speed, at no load
Maximum attainable speed
n0
n
Revolutions or reciprocation Revolutions, strokes, surface speed,
…/min
0
per minute
orbits, etc. per minute
Off position
Zero speed, zero torque...
1,2,3,…
I,II,III,
Speed, torque or position settings. Higher
number means greater speed
Selector settings
Infinitely variable selector
with off
Speed is increasing from 0 setting
Arrow
Action in the direction of arrow
Type or a characteristic of current
Type or a characteristic of current
Type or a characteristic of current
Alternating current
Direct current
Alternating or direct current
Designates Double Insulated Construction
tools.
Class II tool
Earthing terminal
Grounding terminal
Designates Li-ion battery recycling
program
Li-ion RBRC seal
7
| General | Details |
|---|---|
| Name | SKIL RT1323-00 10 Amp Fixed Base Corded Router Owner’s Manual |
| Make | Skil |
| Language | English |
| Filetype | PDF (Download) |
| File size | 7.63 MB |

If you have any questions regarding SKIL RT1323-00 10 Amp Fixed Base Corded Router Owner’s Manual, please ask here and describe the problem in detail.


ASUS GT-AX11000 Pro ROG Rapture Tri-band Gaming Router User Guide

STARLINK LJ439RBIV3M5 Mini Router Installation Guide

Tenda RX27 Pro AX5700 Tri Band Gigabit WiFi 6E Router Installation Guide

ONEX RV Wifi Router User Manual

CNCU CoreDraw Plugin For Router User Guide

D-Link DSR-250V2 5-Gigabit Port VPN Router Installation Guide

TP-Link BE5000 Outdoor/ Mesh Wi-Fi 7 Router User Guide

OptConnect neo 4 Cellular Router User Manual

HIRSCHMANN NB1810 NetModule Router User Manual

ASUS RT-AX88U Pro AX6000 Dual Band WiFi Router User Guide