SKIL RT1323-00 10 Amp Fixed Base Corded Router Owner’s Manual


IMPORTANT CHARGING NOTES
1. The charger was designed to rapidly charge the battery only when the battery temperature
is within the required PWRJUMP charging temperature range. If the battery pack is too hot
or too cold, the charger will not charge the battery rapidly. (This may happen if the battery
pack is hot from heavy use).
2. A substantial drop in operating time per charge may mean that the battery pack is nearing
the end of its life and should be replaced.
3. Remember to unplug the charger during storage.
4. If battery does not charge properly:
a. Check for power at the outlet by plugging another electrical device into the outlet.
b. Check to see if the outlet is connected to a light switch that turns power “off” when lights
are turned off.
c. Check the battery pack terminals for dirt. Clean with cotton swab and alcohol, if
necessary.
d. If proper charging still does not occur, take or send the tool, battery pack and charger to
your local SKIL Service Center. Please refer to the Customer Service information on the
cover of this manual.
NOTICE: Use of chargers or battery packs not sold by SKIL will void the warranty.
11

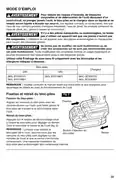
OPERATING INSTRUCTIONS
To reduce the risk of fire, personal injury, and product damage due to
a short circuit, never immerse your charger or battery pack in fluid or
WARNING
allow a fluid to flow inside them. Corrosive or conductive fluids, such as seawater, certain
industrial chemicals, and bleach or bleach-containing products, etc, can cause a short circuit.
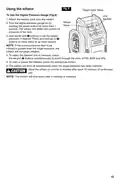
How to Charge the Battery Pack
NOTICE: The battery pack is shipped partially charged.
Before using it the first time, fully charge the battery pack.
The PWRJUMP function charges a fully-depleted 2.0Ah battery pack to approximately 25%
capacity in 5 minutes.
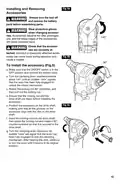
Fig. 2
NOTICE: The remaining 75% charge will be
Attach
achieved under the normal charging mode.
a)Charge the battery pack with the correct
charger.
b)Connect the charger to a power supply. The
red Defect Indicator, green Normal Charging
Indicator, and yellow PWRJUMP Indicator
will shine for one second and then go out,
indicating that the charger self-inspection is
completed.
c) Align the raised ribs of the battery pack with
the slot in the charger.
Detach
d)Insert the battery pack into the charger
(Fig. 2).
e)The charger will communicate with the battery pack to evaluate the condition of the battery
pack.
f) If the battery pack temperature is within the PWRJUMP charging temperature range and the
battery is significantly depleted, the PWRJUMP indicator will shine yellow.
g)Depress the button to activate PWRJUMP charging. The PWRJUMP light will flash green to
indicate PWRJUMP charging.
h)When the battery has charged to approximately 25% capacity in 5 minutes, the green
Normal Charging Indicator will begin flashing to indicate that normal charging is occurring;
the PWRJUMP indicator will remain green.
i) The green normal charging indicator will keep flashing when charging the battery pack
in the normal charging mode. After the charging is complete, the green normal charging
indicator will stay green.
j) A flickering red defect indicator indicates a defective battery or a bad connection between
the battery and the charger.
k) A solid red defect indicator indicates that the battery is over-temperature. Remove the
battery pack from the charger. If the battery is too hot, cool the battery under air flow. If the
battery is too cold, place it indoors until it reaches room temperature.
l) It is not recommended that the battery pack remain on the charger for more than 24 hours.
NOTICE: If the battery pack cannot accept a charge, the contacts of the charger or battery
pack may be contaminated. Clean the contacts of the charger or battery pack (e. g. by
inserting and removing the battery several times or scrubbing with a cotton swab and alcohol)
or replace the battery pack, as required.
12
| General | Details |
|---|---|
| Name | SKIL RT1323-00 10 Amp Fixed Base Corded Router Owner’s Manual |
| Make | Skil |
| Language | English |
| Filetype | PDF (Download) |
| File size | 7.63 MB |

If you have any questions regarding SKIL RT1323-00 10 Amp Fixed Base Corded Router Owner’s Manual, please ask here and describe the problem in detail.


TP-Link Archer AX72 AX5400 Multi-Gigabit Wi-Fi 6 Router Installation Guide

ASUS XD4S AX1800 Dual Band WiFi Router User Guide

D LINK R15 Router using Eagle Pro AI App User Guide

TP-Link AX21 Wi-Fi 6 Router Installation Guide

UfiSpace S9600-64X 100G Aggregation Router Installation Guide

Juniper NETWORKS PTX10003 Fixed Packet Transport Router User Guide

TELTONIKA RUT260 LTE Router User Manual

atop Technologies AWR5805, AWR5805P Wireless Router Installation Guide

TP-Link deco 7100000984 Router Installation Guide

LINOVISION IOT-R32W Cellular Router User Manual