Home > Vantron Technology > Vantron Technology R105 Router User Manual
×
- 1. User Management (Add New Users → Edit Existing Users → Assign Permissions → Enable Ssh Access → Save Settings)
- 2. Customization (Custom Program → Enable/disable User Functions → Upload Scripts To The Router → Script Management → Script Log → Save & Apply Settings)
- 3. Ipk Installer (Select An .ipk File From The Local Directory → Click Upload To Upload The File To The Device → You Can Delete Or Install The File After The .ipk File Is Uploaded → Install The File And Wait A Moment, There Will Be A Prompt For The Installation Status → You Can Also Input A File Path On The Device To Download The Specific File)
- 4. Manufacturer Info Customization (Select The Oem Mode → Download The Illustrative .tar File → Upload The File To The Router → Save & Apply The Settings → Modes Description → Oem Mode)
- 5. Dmp Agent (Clear Agent → Enable/disable The Agent → Customize The Installation Path → Set Up The Download Address Of The Agent Server → Internet Server For Public Domain And Download Server For Private Domain → Factory Reset Of The Router)
- 6. Ser2tcp (Ser2net Environment Setup And Verification → Prerequisites)
- 7. Client Mode (Settings On Vantronos Web Interface → Description Of The Numbered Areas → Add A Conversion Rule → Enable From The Drop-down → Set The Baud Rate To 115200 → Save The Settings)
- 8. Enable The Rule (Select The Work As Client Mode → Input The Server Address And Port Number → Select The Serial Device From The Drop-down List → Select 115200 As The Baud Rate → Set A Timeout Value → Select '8 Bits' For The Data Bit)
- 9. Settings (Monitor The Designated Port → Use Microcom To Access The Serial Port → Tcpudp_test Tcp Server → R105 Industrial Router | User Manual)
- 10. Server Mode (Settings On Vantronos Web Interface → Description Of The Numbered Areas → Add A Conversion Rule → Enable From The Drop-down → Set The Baud Rate To 115200 → Save The Settings)
- 11. Enable The Rule (Select The Work As Server Mode → Input The Port Number (user-defined) → Select A Protocol From The Drop-down → Select The Serial Device From The Drop-down → Select 115200 As The Baud Rate → Set A Timeout Value)
- 12. Settings (Protocol Comparison)
- 13. Dynamic Dns (Rc To Plc → Prerequisites)
- 14. Download And Save The .ovpn File After Setting Up The Openvpn Server On R1 (Click Connect To Connect R2 To The Openvpn Server Built By R1 → Input A Static Ip Address For The Plc → Input A Virtual Ip For The Plc → Be Sure To Save Above Settings To Allow Them To Take Effect)
- 15. Configure Your Router In More Details (Synchronize The Router Time With The Browser (local) Time → Change The Name Of The Host → Select A Time Zone → Enable Ntp Online Time Adjustment → Start The Ntp Server → Ntp Online Time Server)
- 16. Buffer Size Of The System Log (Address Of The Log Server → Port Of The Log Server → Protocol Used By The Log Server → Path Of The File For The System Log → Output Level Of The Console Log → Cron Log Level)
- 17. Netlink Bandwidth Monitor (nbm) Setting (General Settings → Description Of The Numbered Areas → Set How Long You Would Like The Monitoring Activities To Be Reported → Specify A Date In A Month For Restarting Another Round Of Monitoring Activities → Select The Interfaces To Monitor → Local Subnets)
- 18. Advanced Settings (Set Maximum Count Of Entries → Pre-allocate A Database → Compress The Database → Maximum Count Of Reporting Periods → Time Interval For Submitting The Database → Directory Of The Database)
- 19. Administration (Ssh Access)
- 20. Step 4: Open An Ssh Client (putty Or Mobaxterm Recommended) In The Windows Host; (Step 5: Input The Host Name Or Ip Address (lan Port Address By Default: 172.18.1.1), Keep → Step 6: Set The Session Name And Save, Keep The Other Settings Unchanged, Then Click → Step 7: Log In With The Root Account And Password (same As Those In The Prior Step), And → Start An Ssh Remote Session.)
- 21. System > Terminal (Setting Tab → Save & Apply → Web Terminal For Router Debugging → Terminal Tab → Login Name → Login Password)
- 22. Mount Points (Disable/enable Automatic Mount → File Path On The Router → Mount Point → Available Space In The Mount Point → Space Used In Percentage → Manually Unmount A File)
- 23. Detect The Available Mount Points (Click Add To Add A Mount Point → Check The Box To Enable The Mount Point After Creation → Select The Uuid Of The Device → Select The Mount Point → Advanced Settings)
- 24. Select The File System For Formatting The Memory (Input The Mount Options → Save The Settings And Click The Back Or Refresh Button To Return To The General Settings → Backup/flash Firmware → Ota Upgrade)
- 25. Firmware Update (Description Of The Numbered Areas → Check The Box To Keep The User Settings While Upgrading The Device (not Recommended) → Select The Firmware From The Local Directory → Click The Button To Upload The Firmware → Upload Progress Of The Package → Do Not Power Off The Router When Firmware Upgrading Is In Process)
- 26. Backup/restore (Factory Reset The Router → Upload The File → Download The Backup Package → Restore The Factory Settings → Select The Backup File → Click The Button To Back Up The System Configurations)
- 27. Configuration (Reboot → Logout)
- 28. Chapter 4 Disposal And Product Warranty
- 29. Disposal
- 30. Warranty (Out-of-warranty Repair → Returned Products)
- 31. Compliance Statement (Fcc Statement → Installation Instructions → Interference Mitigation Measures → User Responsibilities → Manufacturer's Disclaimer → Radiation Exposure Limits)
- 32. Installation Requirements (Operation Conditions → Antenna Specifications → Radiation Exposure Compliance → Indoor Use Restrictions)
×
Vantron Technology R105 Router User Manual
Vantron| Embedded in your success, Embedded in your better life
World-leading provider of embedded/IoT products and solutions
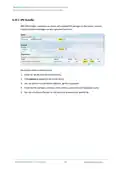
3.13.5 Mount Points
You can enable/disable automount and check the mounting information here.
Description of the numbered areas
1. Disable/Enable automatic mount
2. File path on the Router
3. Mount point
4. Available space in the mount point
5. Space used in percentage
6. If you have previously mounted a file to the device, you can manually unmount the file
here
To manually mount a file, click the Click Disable Automount button first and then proceed
with the settings.
R105 Industrial Router | User Manual
107
| General | Details |
|---|---|
| Name | Vantron Technology R105 Router User Manual |
| Make | Vantron Technology |
| Language | English |
| Filetype | PDF (Download) |
| File size | 0.51 MB |
If you have any questions regarding Vantron Technology R105 Router User Manual, please ask here and describe the problem in detail.


REGIN M4G951 Router Instructions

Adtran SDG-8610 Service Delivery Gateway WiFi 6 Gigabit Router Instruction Manual

ASUS ZenWiFi BD4 Dual Band Wi-Fi Router User Guide

CASTLENET EBM552U Mesh Wi-Fi Router Installation Guide

D-Link DIR-601 Wireless-N 150 Home Router Instructions

Aetheros ESRMKV2C AOS Edge Server Router User Manual

MERCUSYS BE3600 Dual-Band Wi-Fi 7 Router Installation Guide

MICRONET AX1800 Dual Band Wi-Fi 6 Router User Guide

HIKVISION AX1500 Pro WiFi Router User Guide

Helmholz LTE11 Router Owner’s Manual
Table of Contents
- 1. User Management - Add New Users →
- 2. Customization - Custom Program →
- 3. Ipk Installer - Select An .ipk File From The Local Directory →
- 4. Manufacturer Info Customization - Select The Oem Mode →
- 5. Dmp Agent - Clear Agent →
- 6. Ser2tcp - Ser2net Environment Setup And Verification →
- 7. Client Mode - Settings On Vantronos Web Interface →
- 8. Enable The Rule - Select The Work As Client Mode →
- 9. Settings - Monitor The Designated Port →
- 10. Server Mode - Settings On Vantronos Web Interface →
- 11. Enable The Rule - Select The Work As Server Mode →
- 12. Settings - Protocol Comparison →
- 13. Dynamic Dns - Rc To Plc →
- 14. Download And Save The .ovpn File After Setting Up The Openvp... →
- 15. Configure Your Router In More Details - Synchronize The Rout... →
- 16. Buffer Size Of The System Log - Address Of The Log Server →
- 17. Netlink Bandwidth Monitor (nbm) Setting - General Settings →
- 18. Advanced Settings - Set Maximum Count Of Entries →
- 19. Administration - Ssh Access →
- 20. Step 4: Open An Ssh Client (putty Or Mobaxterm Recommended) ... →
- 21. System > Terminal - Setting Tab →
- 22. Mount Points - Disable/enable Automatic Mount →
- 23. Detect The Available Mount Points - Click Add To Add A Mount... →
- 24. Select The File System For Formatting The Memory - Input The... →
- 25. Firmware Update - Description Of The Numbered Areas →
- 26. Backup/restore - Factory Reset The Router →
- 27. Configuration - Reboot →
- 28. Chapter 4 Disposal And Product Warranty →
- 29. Disposal →
- 30. Warranty - Out-of-warranty Repair →
- 31. Compliance Statement - Fcc Statement →
- 32. Installation Requirements - Operation Conditions →


