Home > Vantron Technology > Vantron Technology R105 Router User Manual
×
- 1. User Management (Add New Users → Edit Existing Users → Assign Permissions → Enable Ssh Access → Save Settings)
- 2. Customization (Custom Program → Enable/disable User Functions → Upload Scripts To The Router → Script Management → Script Log → Save & Apply Settings)
- 3. Ipk Installer (Select An .ipk File From The Local Directory → Click Upload To Upload The File To The Device → You Can Delete Or Install The File After The .ipk File Is Uploaded → Install The File And Wait A Moment, There Will Be A Prompt For The Installation Status → You Can Also Input A File Path On The Device To Download The Specific File)
- 4. Manufacturer Info Customization (Select The Oem Mode → Download The Illustrative .tar File → Upload The File To The Router → Save & Apply The Settings → Modes Description → Oem Mode)
- 5. Dmp Agent (Clear Agent → Enable/disable The Agent → Customize The Installation Path → Set Up The Download Address Of The Agent Server → Internet Server For Public Domain And Download Server For Private Domain → Factory Reset Of The Router)
- 6. Ser2tcp (Ser2net Environment Setup And Verification → Prerequisites)
- 7. Client Mode (Settings On Vantronos Web Interface → Description Of The Numbered Areas → Add A Conversion Rule → Enable From The Drop-down → Set The Baud Rate To 115200 → Save The Settings)
- 8. Enable The Rule (Select The Work As Client Mode → Input The Server Address And Port Number → Select The Serial Device From The Drop-down List → Select 115200 As The Baud Rate → Set A Timeout Value → Select '8 Bits' For The Data Bit)
- 9. Settings (Monitor The Designated Port → Use Microcom To Access The Serial Port → Tcpudp_test Tcp Server → R105 Industrial Router | User Manual)
- 10. Server Mode (Settings On Vantronos Web Interface → Description Of The Numbered Areas → Add A Conversion Rule → Enable From The Drop-down → Set The Baud Rate To 115200 → Save The Settings)
- 11. Enable The Rule (Select The Work As Server Mode → Input The Port Number (user-defined) → Select A Protocol From The Drop-down → Select The Serial Device From The Drop-down → Select 115200 As The Baud Rate → Set A Timeout Value)
- 12. Settings (Protocol Comparison)
- 13. Dynamic Dns (Rc To Plc → Prerequisites)
- 14. Download And Save The .ovpn File After Setting Up The Openvpn Server On R1 (Click Connect To Connect R2 To The Openvpn Server Built By R1 → Input A Static Ip Address For The Plc → Input A Virtual Ip For The Plc → Be Sure To Save Above Settings To Allow Them To Take Effect)
- 15. Configure Your Router In More Details (Synchronize The Router Time With The Browser (local) Time → Change The Name Of The Host → Select A Time Zone → Enable Ntp Online Time Adjustment → Start The Ntp Server → Ntp Online Time Server)
- 16. Buffer Size Of The System Log (Address Of The Log Server → Port Of The Log Server → Protocol Used By The Log Server → Path Of The File For The System Log → Output Level Of The Console Log → Cron Log Level)
- 17. Netlink Bandwidth Monitor (nbm) Setting (General Settings → Description Of The Numbered Areas → Set How Long You Would Like The Monitoring Activities To Be Reported → Specify A Date In A Month For Restarting Another Round Of Monitoring Activities → Select The Interfaces To Monitor → Local Subnets)
- 18. Advanced Settings (Set Maximum Count Of Entries → Pre-allocate A Database → Compress The Database → Maximum Count Of Reporting Periods → Time Interval For Submitting The Database → Directory Of The Database)
- 19. Administration (Ssh Access)
- 20. Step 4: Open An Ssh Client (putty Or Mobaxterm Recommended) In The Windows Host; (Step 5: Input The Host Name Or Ip Address (lan Port Address By Default: 172.18.1.1), Keep → Step 6: Set The Session Name And Save, Keep The Other Settings Unchanged, Then Click → Step 7: Log In With The Root Account And Password (same As Those In The Prior Step), And → Start An Ssh Remote Session.)
- 21. System > Terminal (Setting Tab → Save & Apply → Web Terminal For Router Debugging → Terminal Tab → Login Name → Login Password)
- 22. Mount Points (Disable/enable Automatic Mount → File Path On The Router → Mount Point → Available Space In The Mount Point → Space Used In Percentage → Manually Unmount A File)
- 23. Detect The Available Mount Points (Click Add To Add A Mount Point → Check The Box To Enable The Mount Point After Creation → Select The Uuid Of The Device → Select The Mount Point → Advanced Settings)
- 24. Select The File System For Formatting The Memory (Input The Mount Options → Save The Settings And Click The Back Or Refresh Button To Return To The General Settings → Backup/flash Firmware → Ota Upgrade)
- 25. Firmware Update (Description Of The Numbered Areas → Check The Box To Keep The User Settings While Upgrading The Device (not Recommended) → Select The Firmware From The Local Directory → Click The Button To Upload The Firmware → Upload Progress Of The Package → Do Not Power Off The Router When Firmware Upgrading Is In Process)
- 26. Backup/restore (Factory Reset The Router → Upload The File → Download The Backup Package → Restore The Factory Settings → Select The Backup File → Click The Button To Back Up The System Configurations)
- 27. Configuration (Reboot → Logout)
- 28. Chapter 4 Disposal And Product Warranty
- 29. Disposal
- 30. Warranty (Out-of-warranty Repair → Returned Products)
- 31. Compliance Statement (Fcc Statement → Installation Instructions → Interference Mitigation Measures → User Responsibilities → Manufacturer's Disclaimer → Radiation Exposure Limits)
- 32. Installation Requirements (Operation Conditions → Antenna Specifications → Radiation Exposure Compliance → Indoor Use Restrictions)
×
Vantron Technology R105 Router User Manual
Vantron| Embedded in your success, Embedded in your better life
World-leading provider of embedded/IoT products and solutions
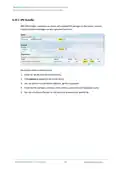
For log-related settings, click Logging tab next to the General settings tab.
Description of the numbered areas
1. Buffer size of the system log
2. Address of the log server
3. Port of the log server
4. Protocol used by the log server
5. Path of the file for the system log
6. Output level of the console log
7. Cron log level
R105 Industrial Router | User Manual
101
| General | Details |
|---|---|
| Name | Vantron Technology R105 Router User Manual |
| Make | Vantron Technology |
| Language | English |
| Filetype | PDF (Download) |
| File size | 0.51 MB |
If you have any questions regarding Vantron Technology R105 Router User Manual, please ask here and describe the problem in detail.


ZTE U30 Air 5g Portable WiFi Mobile WiFi Router User Guide

TP-Link ER605 Omada VPN Router Installation Guide

ASUS DSL-AX82U Dual Band WiFi 6 Extendable xDSL Modem Gaming Router Instructions

ReadyNet AX1500M WiFi6 Wireless Router User Guide

ASUS XD4S AX1800 Dual Band WiFi Router User Guide

motorola Q14 Mesh WiFi 6E Router User Guide

TP-Link AX6600 Tri-Band WiFi 6 Gaming Router Installation Guide

Adtran 854-(v)6 Service Delivery Gateway WiFi 6 2.5G Router User Guide

VEVOR 0700C Wood Router User Manual

NEXXT Nyx1200-AC Plus Dual Band AC Wireless Router User Guide
Table of Contents
- 1. User Management - Add New Users →
- 2. Customization - Custom Program →
- 3. Ipk Installer - Select An .ipk File From The Local Directory →
- 4. Manufacturer Info Customization - Select The Oem Mode →
- 5. Dmp Agent - Clear Agent →
- 6. Ser2tcp - Ser2net Environment Setup And Verification →
- 7. Client Mode - Settings On Vantronos Web Interface →
- 8. Enable The Rule - Select The Work As Client Mode →
- 9. Settings - Monitor The Designated Port →
- 10. Server Mode - Settings On Vantronos Web Interface →
- 11. Enable The Rule - Select The Work As Server Mode →
- 12. Settings - Protocol Comparison →
- 13. Dynamic Dns - Rc To Plc →
- 14. Download And Save The .ovpn File After Setting Up The Openvp... →
- 15. Configure Your Router In More Details - Synchronize The Rout... →
- 16. Buffer Size Of The System Log - Address Of The Log Server →
- 17. Netlink Bandwidth Monitor (nbm) Setting - General Settings →
- 18. Advanced Settings - Set Maximum Count Of Entries →
- 19. Administration - Ssh Access →
- 20. Step 4: Open An Ssh Client (putty Or Mobaxterm Recommended) ... →
- 21. System > Terminal - Setting Tab →
- 22. Mount Points - Disable/enable Automatic Mount →
- 23. Detect The Available Mount Points - Click Add To Add A Mount... →
- 24. Select The File System For Formatting The Memory - Input The... →
- 25. Firmware Update - Description Of The Numbered Areas →
- 26. Backup/restore - Factory Reset The Router →
- 27. Configuration - Reboot →
- 28. Chapter 4 Disposal And Product Warranty →
- 29. Disposal →
- 30. Warranty - Out-of-warranty Repair →
- 31. Compliance Statement - Fcc Statement →
- 32. Installation Requirements - Operation Conditions →


